If you're like us, you've probably spent the week after Thanksgiving eating nothing but leftover turkey and side dishes. In an effort to not just recreate our Thanksgiving dinner plates, we got creative and turned our leftovers into turkey pot pies!
We started by quartering a few potatoes and peeling a few leftover carrots, and popping them into the oven to roast them for about 15 minutes. Since they typically have a longer cook time, roasting them first helps minimize the time your pot pies need to be in the oven. Plus, it gives them a nice roasty flavor.
While those are roasting, you can make your dough to top your pies. We kept it simple by combining 1 cup of flour with 1 cup of chilled butter, and a splash of vodka. Try not to overmix the dough, as you want the butter to stay as cold as possible. Once our dough came together, we wrapped it in some plastic wrap, and stuck it in the freezer to get it cold again. This will help give you a nice, flaky crust. If you're making your dough in advance, you can just keep your dough in the fridge.
Once the dough was chilling, we started building our pies. We chopped up some fresh onion, and dropped them into our little bowls. Then, each bowl got a healthy spoonful of our leftover green bean casserole.
Then we chopped up some turkey meat, and added those to each bowl. At this point, the potatoes and carrots were also done, so we chopped those into smaller pieces and tossed them in the bowls as well.
The one thing that was missing was a bit of a gravy. So we added in a few spoonfuls of our turkey stock, as well as a splash of milk. Then give everything a little toss and turn in the bowl so it's all mixed up and coated in the stock and milk.
Then, just role out your dough, cut it into circles wide enough to top your bowls. Make sure you cut slits in the top to so the steam can escape (clearly the 2 on the right were our first crusts). You also want to beat an egg and brush each crust with the egg wash. This will give you a nice, golden brown crust.
Be sure to place your pies on a baking sheet to catch any gravy that may spill out of your pies. Pop them into a 350 degree oven for about 15 minutes, or until your crusts are cooked through, and golden brown.
The crust was buttery and really flaky, almost like a biscuit. It was the perfect topper for our pot pies, and a great way to repurpose our leftovers.
Showing posts with label carrot. Show all posts
December 10, 2013
March 27, 2013
It was Colonel Mustard, in the dutch oven, with the leeks
Since we're heading out of town this weekend for Easter, we needed to find a way to use the rest of our share food. We turned to the interwebs, as always, for inspiration, and came up with pork chops with a mustard sauce, roasted turnips, and salad. So let's get started...
Start by slicing up your carrots, celery, and leeks. We included the leaves from the tops of the celery too. Because of all the layers in the leeks, a lot of dirt can get in there. Once you slice them, you'll want to place them in a bowl with water, and swish them around, separating the layers. All the dirt will sink to the bottom of the bowl, and you'll be left with clean leeks!
Then we melted some butter in the dutch oven, and threw all the veggies in there to soften. Once they've cooked down a bit, add your whole grain mustard and almond milk.
Once everything's had a chance to mix together, nestle your pork chops into the mixture. We also added a couple bay leaves, some parsley and thyme. We threw a lid on it and let it cook for about 15 minutes. While those were cooking, we roasted up some turnips with a bit of grated red onion on top.
We also threw together a quick salad with our creasy greens, some carrots, red onion, and the rest of the pate we had leftover from our rainy day soup & salad dinner. With a simple dressing of olive oil and champagne vinegar, we were ready to eat!
Start by slicing up your carrots, celery, and leeks. We included the leaves from the tops of the celery too. Because of all the layers in the leeks, a lot of dirt can get in there. Once you slice them, you'll want to place them in a bowl with water, and swish them around, separating the layers. All the dirt will sink to the bottom of the bowl, and you'll be left with clean leeks!
Then we melted some butter in the dutch oven, and threw all the veggies in there to soften. Once they've cooked down a bit, add your whole grain mustard and almond milk.
Once everything's had a chance to mix together, nestle your pork chops into the mixture. We also added a couple bay leaves, some parsley and thyme. We threw a lid on it and let it cook for about 15 minutes. While those were cooking, we roasted up some turnips with a bit of grated red onion on top.March 25, 2013
It's a Wrap!
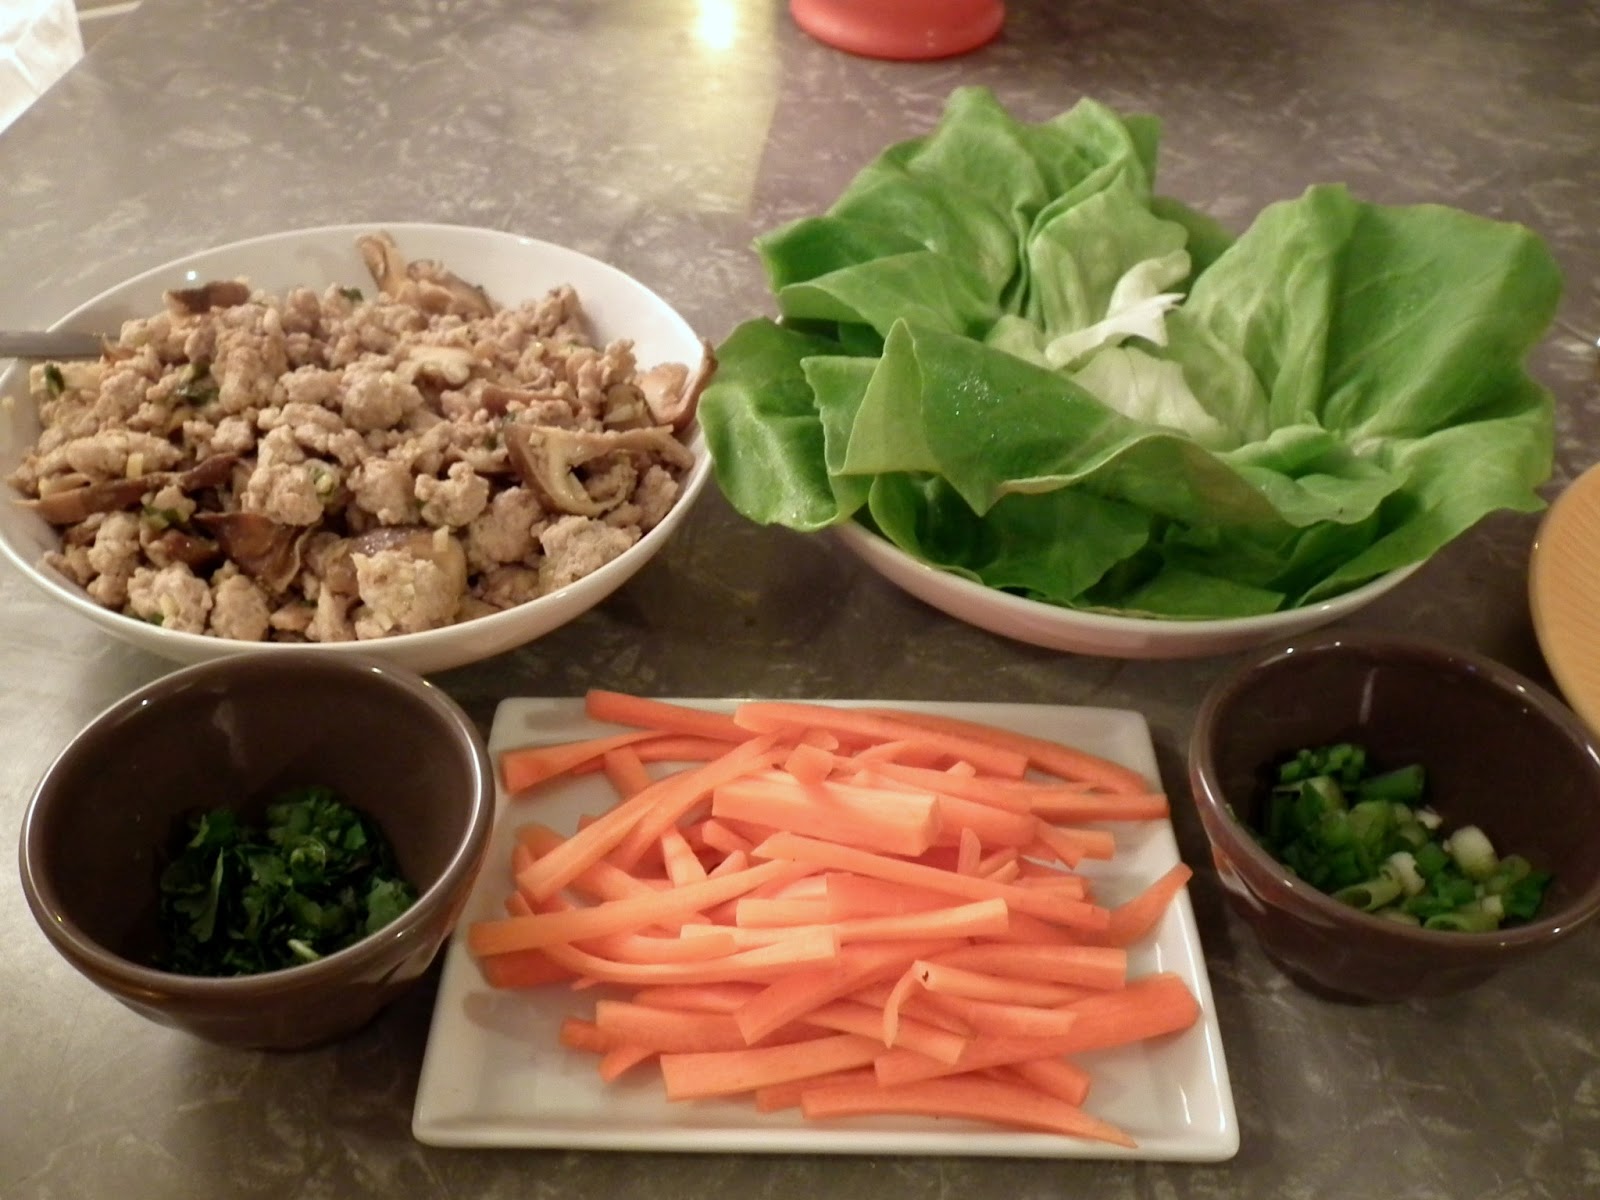
On a cold, rainy night like tonight we were looking for a quick, easy, healthy, tasty, and comforting meal. We were hungry for some delicious pot stickers like we had at Chinese New Year, but we wanted to keep it Paleo, and use some of our share ingredients, so decided to make some Asian lettuce wraps.
Essentially, we used the recipe for the pot sticker filling. We started by mincing up some ginger, garlic, and scallions.
That was all mixed with some ground pork, salt, white pepper, sesame oil, a little soy sauce, and a dash of Chinese cooking wine. Next we chopped up our shitakes from the share, and tossed it all together.
We cooked the mixture in a pan with a bit of coconut oil, and it was ready in no time. While that cooked, we julienned some carrots to wrap up in the lettuce, and chopped up a little more green onion, and some cilantro to garnish.
We tore the leaves from the head of bibb lettuce to use as our wraps, and set up a little station to build our wraps. Just spoon in some pork and mushrooms, add a few carrot sticks, top with some green onion and cilantro, and you're good to go!
March 11, 2013
Homemade Kimchi
You've heard us talk about our homemade kimchi a few times (here and here), and we're finally spilling the beans on how we made it.
We used this recipe, given to us by my cousin, that came from The Lucky Peach.
We just had a head of regular green cabbage on hand, rather than the suggested napa cabbage, but from our previous experience, the green cabbage worked just as well. Start by chopping your cabbage into big hunks. You'll season liberally with salt and sugar, and let it sit in the fridge overnight.
Next, you'll want to whip up the seasonings. In a food processor, puree the garlic, ginger, soy sauce, Korean chili flake, fish sauce, and brine shrimp.
Once that's formed a nice paste/sauce, dump it over your cabbage, carrots and green onion. We also added some daikon to the mix. Here's where you'll want to get in there with your hands to make sure the spice mixture gets into all the nooks and crannies of the cabbage.
Once everything is good and mixed, you'll want to stuff everything into a clean glass jar that can be sealed air tight. We used the jars we picked up from Ikea, that we've also used for our sauerkraut. Stuff as much of the cabbage as you can into the jar. If you don't have a jar, you can also use a plastic container with a lid. In our first attempt at making kimchi, we went this route, and it came out great! The key is to make sure that the cabbage is packed in as tightly as possible, and no air can get in.
Then you just place it in the fridge and let it ferment. After a week or so, it'll be ready to go!
We used this recipe, given to us by my cousin, that came from The Lucky Peach.
We just had a head of regular green cabbage on hand, rather than the suggested napa cabbage, but from our previous experience, the green cabbage worked just as well. Start by chopping your cabbage into big hunks. You'll season liberally with salt and sugar, and let it sit in the fridge overnight.Next, you'll want to whip up the seasonings. In a food processor, puree the garlic, ginger, soy sauce, Korean chili flake, fish sauce, and brine shrimp.
Once that's formed a nice paste/sauce, dump it over your cabbage, carrots and green onion. We also added some daikon to the mix. Here's where you'll want to get in there with your hands to make sure the spice mixture gets into all the nooks and crannies of the cabbage.
Once everything is good and mixed, you'll want to stuff everything into a clean glass jar that can be sealed air tight. We used the jars we picked up from Ikea, that we've also used for our sauerkraut. Stuff as much of the cabbage as you can into the jar. If you don't have a jar, you can also use a plastic container with a lid. In our first attempt at making kimchi, we went this route, and it came out great! The key is to make sure that the cabbage is packed in as tightly as possible, and no air can get in.
Then you just place it in the fridge and let it ferment. After a week or so, it'll be ready to go!
March 9, 2013
Whole Roasted Chicken
Tonight we tackled a whole roasted chicken for dinner. It may seem like a daunting task, but in reality, the oven does all the work. We ventured over to Trader Joe's to pick up some groceries for the week, and picked up our bird. The nice thing is that they have whole organic chickens that are already brined. Whether you brine it yourself or buy a pre-brined bird, brining is the way to go. It helps keep the meat really moist and delicious.
So once we got our bird home, Justin got to work on him, giving him a nice rub down with some butter and Kosher salt, making sure to get some of the butter under the skin as well. Despite the brining, you still want to liberally salt the skin. This too will help keep him moist. And the butter helps brown the skin so it's nice and crispy.

While Justin was massaging the chicken, I got to work chopping up all the veggies to make a nice little bed for him. We went with leeks, celery, half an onion, and some carrots.
I also got together the aromatics that we stuffed into the cavity of the bird. These included a whole lemon, sage, rosemary, thyme, garlic, and half an onion. Then you just stuff it all inside the cavity.
Once everything is stuffed inside, you want to close the cavity by tying the drumsticks together. We'd consulted Ruhlman's Twenty prior to roasting to see what Mr. Ruhlman suggested, and to keep the meat moist, he recommended either stuffing the cavity or closing the cavity (he also recommended the liberal use of salt). Doing so prevents the hot air from circulating through there and drying the meat out from the inside. We figured we'd do both, to keep the meat moist, and add some additional flavors.
Once he was all tied up, we placed him on his bed of veggies so he was nice and cozy, and placed him in a 450 degree oven for about 45 minutes. Justin has a convection oven, so he cooked a bit faster than if we were using my regular oven. If you want to check your bird, the telltale sign of doneness is when the juices run clear. After about 45 minutes, our bird was pretty much done. We wanted to crisp up all of his skin, so we flipped him, and put him back in the oven for about 10 minutes.
Mmmm...look at that delicious, golden brown, crispy skin! Just like any other meat, you'll want to let your chicken rest for a good 10 minutes before you start carving him. So while our guy rested, I added a little butter, and some fresh thyme, sage, rosemary, and fresh cracked pepper to the veggies. I also took a wedge of lemon that had been in the cavity, and squeezed some of the juice over them. Then it was time to eat!
The meat was so juicy and moist, with hints of the lemon and herbs that we'd stuffed inside it. The skin was perfectly crisp with just a hint of salt. The veggies still had some bit to them, and were a perfect complement to the bird. We also baked up a sweet potato and topped it with some pancetta and green onion. So if you're looking for an easy, one pan meal, you should definitely try roasting a whole chicken. Plus you'll have leftovers for later in the week!
So once we got our bird home, Justin got to work on him, giving him a nice rub down with some butter and Kosher salt, making sure to get some of the butter under the skin as well. Despite the brining, you still want to liberally salt the skin. This too will help keep him moist. And the butter helps brown the skin so it's nice and crispy.

While Justin was massaging the chicken, I got to work chopping up all the veggies to make a nice little bed for him. We went with leeks, celery, half an onion, and some carrots.
I also got together the aromatics that we stuffed into the cavity of the bird. These included a whole lemon, sage, rosemary, thyme, garlic, and half an onion. Then you just stuff it all inside the cavity.
Once everything is stuffed inside, you want to close the cavity by tying the drumsticks together. We'd consulted Ruhlman's Twenty prior to roasting to see what Mr. Ruhlman suggested, and to keep the meat moist, he recommended either stuffing the cavity or closing the cavity (he also recommended the liberal use of salt). Doing so prevents the hot air from circulating through there and drying the meat out from the inside. We figured we'd do both, to keep the meat moist, and add some additional flavors.
Once he was all tied up, we placed him on his bed of veggies so he was nice and cozy, and placed him in a 450 degree oven for about 45 minutes. Justin has a convection oven, so he cooked a bit faster than if we were using my regular oven. If you want to check your bird, the telltale sign of doneness is when the juices run clear. After about 45 minutes, our bird was pretty much done. We wanted to crisp up all of his skin, so we flipped him, and put him back in the oven for about 10 minutes.
Mmmm...look at that delicious, golden brown, crispy skin! Just like any other meat, you'll want to let your chicken rest for a good 10 minutes before you start carving him. So while our guy rested, I added a little butter, and some fresh thyme, sage, rosemary, and fresh cracked pepper to the veggies. I also took a wedge of lemon that had been in the cavity, and squeezed some of the juice over them. Then it was time to eat!
The meat was so juicy and moist, with hints of the lemon and herbs that we'd stuffed inside it. The skin was perfectly crisp with just a hint of salt. The veggies still had some bit to them, and were a perfect complement to the bird. We also baked up a sweet potato and topped it with some pancetta and green onion. So if you're looking for an easy, one pan meal, you should definitely try roasting a whole chicken. Plus you'll have leftovers for later in the week!
Labels:
brine,
carrot,
celery,
chicken,
green onion,
leek,
lemon,
Michael Ruhlman,
Onion,
pancetta,
roast,
rosemary,
sage,
sweet potatoes,
thyme,
Trader Joe's
February 20, 2013
Banh Who? Banh Mi!
Justin's been dying to cook something out of his Eat With Your Hands cookbook that I gave him for Christmas. So when we got oysters in our share again this week, he jumped at the opportunity to make oyster banh mi. If you're not familiar with this delicious Vietnamese sandwich, I'll break it down for you. You start with a nice, crusty baguette, some kind of meat in the middle, pickled vegetables, and pate. The baguette and the pate harken back to the French influence that once reigned over Vietnam.
So here's our version, ala Zakary Pelaccio...
We started by making a sambal aioli. We toasted up some shrimp paste (belecan) to take some of the stinkiness out of it. If you haven't experienced it, you can smell it from across the room, and its a pretty pungent smell. But it adds a great flavor to dishes. This was mixed with some chili garlic sauce and our homemade aioli.
For the pickled vegetables, we stuck with carrots and daikon, marinated in a bit of vinegar, fish sauce, honey and cayenne. This added a bit of acidity, sweetness, and crunch to the sandwich.
The oysters were tossed in a bit of flour, cornstarch, salt and white pepper. Then we dropped them into the hot oil to fry up. They were ready in a matter of minutes.
Then it was time to build the sandwich! We toasted up the buns, and just like we did for our po' boys, I pulled out some of the bread from each side to make little troughs for everything to sit in. The sambal aioli went on both sides of the bread. On top of the oysters we laid a few slices of mortadella. This replaced the traditional pate. Then some fresh cilantro and some of the pickled veggies topped things off. To drink, Zak recommended Asahi, but none of our local beer suppliers had bombers of it, and we forgot to pick one up at H-Mart, so we had to come up with an alternate drink pairing. We went with a Vietnamese-style iced coffee. Since we only had regular coffee, we brewed some up, let it cool, and added it to some sweetened condensed milk. It wasn't as strong as your typical Vietnamese iced coffee, but it did the trick!
Even though there were so many elements in one sandwich, the individual flavors came through, and played off each other nicely. The oysters were sweet, the mortadella added a little saltiness, there was some spice from the aioli, acidity and crunch from the pickled vegetables, and freshness from the cilantro. Not to mention the crusty, toasty bread. It's definitely the best banh mi we've had in DC!
So here's our version, ala Zakary Pelaccio...
We started by making a sambal aioli. We toasted up some shrimp paste (belecan) to take some of the stinkiness out of it. If you haven't experienced it, you can smell it from across the room, and its a pretty pungent smell. But it adds a great flavor to dishes. This was mixed with some chili garlic sauce and our homemade aioli.
For the pickled vegetables, we stuck with carrots and daikon, marinated in a bit of vinegar, fish sauce, honey and cayenne. This added a bit of acidity, sweetness, and crunch to the sandwich.
The oysters were tossed in a bit of flour, cornstarch, salt and white pepper. Then we dropped them into the hot oil to fry up. They were ready in a matter of minutes.
Then it was time to build the sandwich! We toasted up the buns, and just like we did for our po' boys, I pulled out some of the bread from each side to make little troughs for everything to sit in. The sambal aioli went on both sides of the bread. On top of the oysters we laid a few slices of mortadella. This replaced the traditional pate. Then some fresh cilantro and some of the pickled veggies topped things off. To drink, Zak recommended Asahi, but none of our local beer suppliers had bombers of it, and we forgot to pick one up at H-Mart, so we had to come up with an alternate drink pairing. We went with a Vietnamese-style iced coffee. Since we only had regular coffee, we brewed some up, let it cool, and added it to some sweetened condensed milk. It wasn't as strong as your typical Vietnamese iced coffee, but it did the trick!
Even though there were so many elements in one sandwich, the individual flavors came through, and played off each other nicely. The oysters were sweet, the mortadella added a little saltiness, there was some spice from the aioli, acidity and crunch from the pickled vegetables, and freshness from the cilantro. Not to mention the crusty, toasty bread. It's definitely the best banh mi we've had in DC!
Labels:
aioli,
banh mi,
carrot,
cilantro,
daikon,
iced coffee,
mortadella,
oysters,
pickled,
sambal,
Vietnam,
Zakary Pelaccio
Subscribe to:
Posts (Atom)