Showing posts with label ricotta. Show all posts

August 27, 2013

Two Hungry [Artichoke] Hearts

We were watching Sandwich King the other day on Food Network, and Jeff was whipping up a grilled artichoke sandwich with a roasted garlic ricotta spread.  All of the components sounded great, so we took them, and morphed them into a delicious grilled salad.

Start by roasting your garlic.  It takes about at least 30 minutes for it to roast, so you'll want to start with this step so it can caramelize and soften while you prepare everything else.  I peeled away some of the outer layers of the garlic skin first.  Then, you'll want to slice off the top of the head so the cloves are exposed.  Drizzle olive oil over the top, and sprinkle on some salt and pepper.  Wrap up the garlic in foil and place it in a 350 degree oven for 30 minutes, or until it is fragrant and soft.

While the garlic is roasting, you can start preparing everything else.  We wanted to make the salad a little more hearty, and we had a couple chicken breasts on hand, so we simply seasoned with salt and pepper and a little oregano, and threw them on the grill.  The romaine heart was quartered, and a whole can of quartered artichoke hearts were drained.  The romaine, artichoke hearts, and a red bell pepper all received a liberal brushing of olive oil, and sprinkle of salt and pepper.  Then we threw them on the grill.  The romaine and artichokes only took about 5 minutes, while the pepper took about 10 minutes.  You want the pepper to get nice and charred so you can easily peel the skin off.

Once they've cooled down enough for you to handle, give your romaine a rough chop.  Peel the skin off your pepper, and slice it into thin strips.  Add this all to a bowl with your grilled artichokes.  For some freshness, we tossed in some mixed greens and thinly sliced red onion.  You can also toast up some pine nuts to top your salad, for some added crunch.  Now just plate your salads, and add the sliced chicken on top.  For dressing, we just drizzled some balsamic vinegar over the top.

Now, don't think I forgot about our roasted garlic.  When it's soft, and sweet smelling, pull it out of the oven, and squeeze out your cloves.  They should be a golden brown, and nice and soft.  Using the side of your knife, you should be able to smoosh the garlic into a paste.  You can add a little salt to add some coarseness and help  assist you in making the paste.  Then just add your garlic to a bowl with ricotta, parmesan, and lemon zest.
Mix it all together so it's well mixed, and you're ready to spread it on some crostini, topped with fresh basil.  The velvety ricotta with the sweet roasted garlic was the perfect compliment to our grilled salad.

March 10, 2013

Cheat Day Brunch

Since we lost an hour of sleep last night, we ended up sleeping in a little later than planned.  It was too late for breakfast, but we weren't ready for lunch quite yet, so we decided to make a fantastic brunch right at home.  You know how us DCers love our brunch!  With our new Paleo diet, we designated Sundays as our cheat day.  We didn't stray too far from it for brunch, but there were definitely a few ingredients you wouldn't find in the typical Paleo plan...ricotta, parmesan, flour.  We started our day with a frittata, filled with greens and bacon, and some apple pancakes, which were more apple than pancake.

We first got to work on the frittata by cooking up some bacon.  Once it was nice and crispy, we took it out of the pan, so we could cook up the other ingredients in the rendered fat.  The extra fat that we didn't need at the moment, went into a dish nearby, to be added back in later.

Next, it was time to saute the shallots in some of that bacon fat.  Once those were softened, we tossed in the greens.  We didn't want to use all of our kale, so we used a bit of kale and a bit of spinach.  These were also cooked up in the bacon fat until they had wilted.
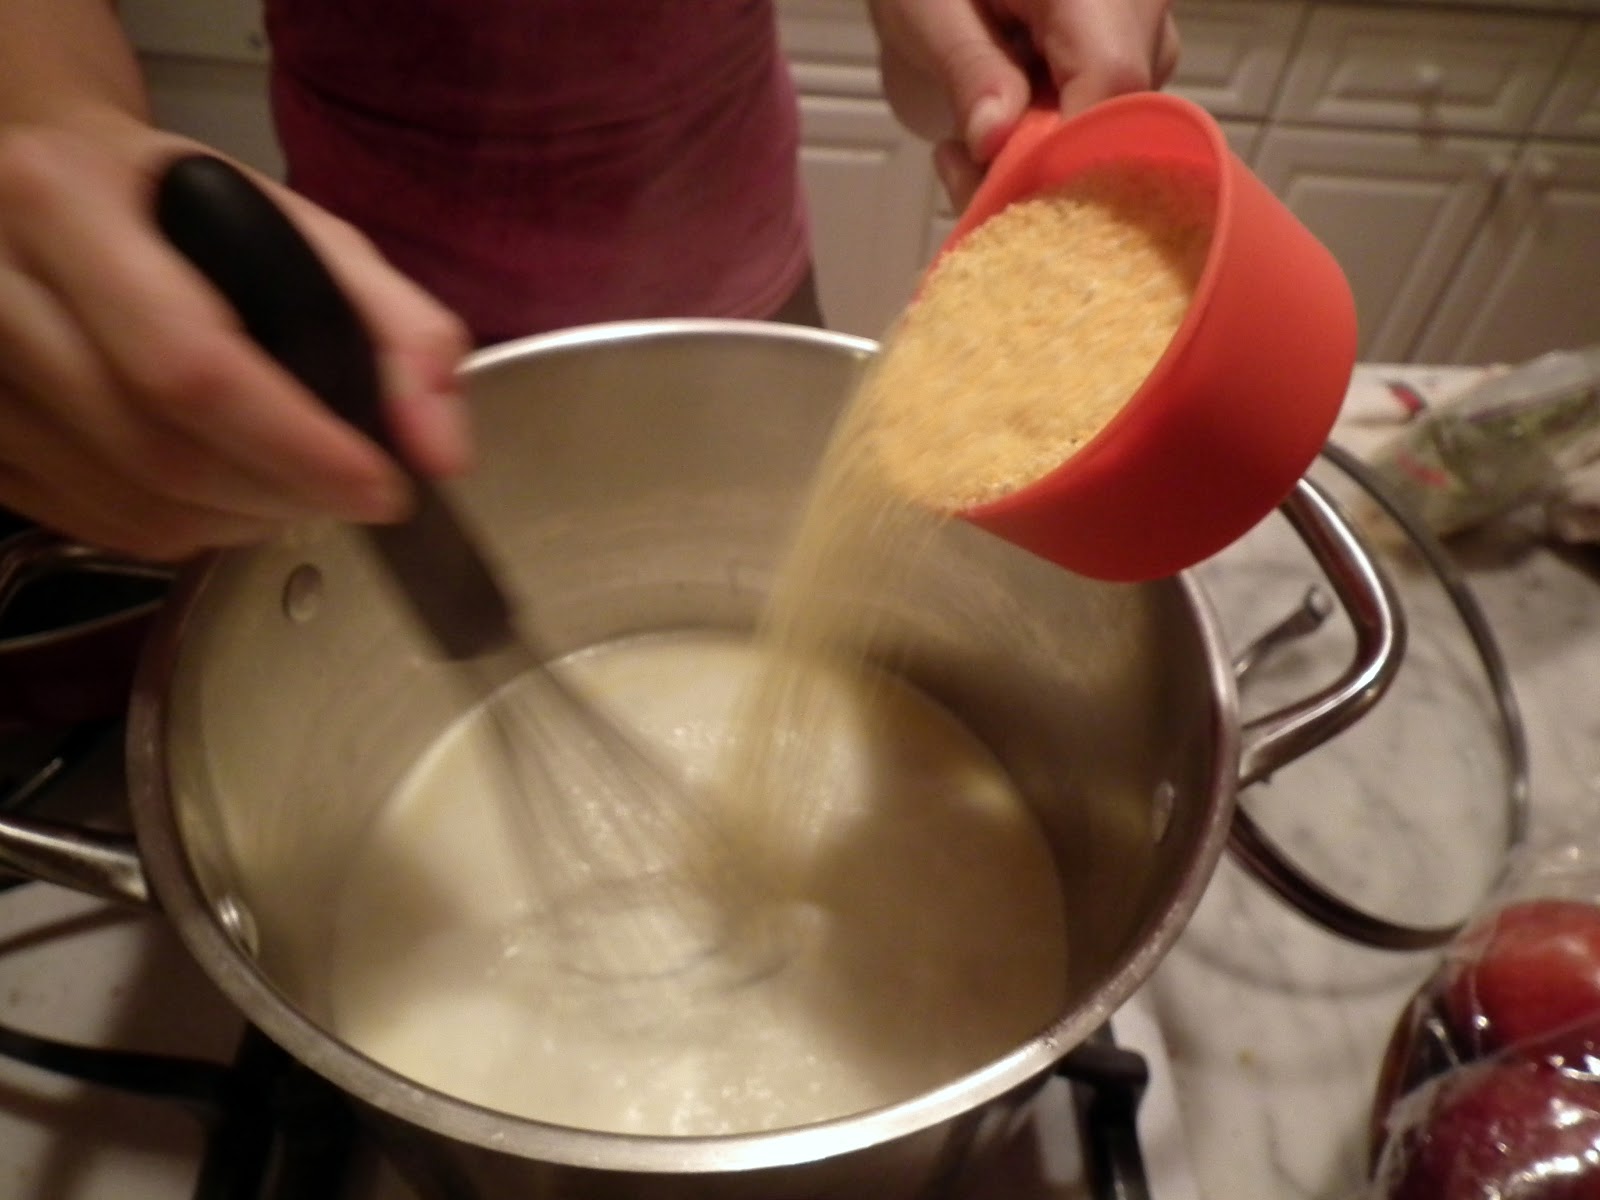
While that was going on, I mixed together the eggs, parmesan, and ricotta.  Once those were thoroughly mixed, we added in half of the bacon, and the cooled greens and shallots.  You don't want to add them to the egg mixture while they're piping hot, otherwise you'll end up with scrambled eggs.  We also added in some black pepper, crushed red pepper flakes, and some dried parsley.
Once everything is mixed together, you'll pour it back into your pan.  Spread the mixture out evenly, and top it with the rest of your bacon and more parmesan cheese.  Once the edges have set, you're ready to throw 'er in the oven to finish baking for about 20 minutes.  When she's done, she'll look like this...

Now, for the pancakes!  I made these while the frittata was baking in the oven.

Start by peeling, coring and slicing your apples into rings.  We used the fuji apple and one of the granny smith apples.  The batter was simple...just some flour, eggs, milk, melted butter, baking powder and cinnamon.  Since we always like to put our own little twist on recipes, we also added in some pumpkin pie spice (since we didn't have any nutmeg on hand), and some chopped pecans.

Once your batter is mixed, just dunk your rings in the batter so they're completely coated, and place them in the pan to cook up.  One thing we learned after the first batch...if you decide to add nuts to the batter, its probably best to spoon them into the hole of your apple rings.  This will allow the apples to sit flat in the pan, and cook up more evenly.
But that's the fun part about cooking...it's all about trial and error, learning as you go, and making adjustments along the way.  That first batch may not have looked the prettiest, but they still tasted pretty darn good!

In the end, we had a delicious brunch.  The frittata was a savory dish, balanced out by the creamy ricotta. While the pancakes were sweet and tart from the apples, which still had a nice crunch to them.  And brunch wouldn't be complete without a bloody mary!  The only thing we were missing was a slice of cantaloupe at the end to make it a complete brunch.

February 25, 2013

Monday Night Mangia!

Tonight, we have a quick, easy chicken piccata with a side of creamy polenta with kale.  It came together rather quickly and was really tasty to boot!  So let's get started...

You'll want to strip the kale off the ribs, and slice up a few cloves of garlic.  Cook up the garlic in a little olive oil, just until it's fragrant, and then add your kale so it cooks down a bit.
While the kale is sauteeing, bring to a boil some water, milk and butter.  Once it starts boiling, whisk in the polenta.  Keep whisking until it thickens.
Once the kale has wilted down a bit, you can coarsely chop it, then add it to the polenta.  Make sure you continue to stir your polenta every once in a while.
 
Let the polenta continue cooking.  Right before you're ready to serve it, stir in the ricotta and let it heat through.  To put our own little spin on the dish, we added a little crushed red pepper flakes for a little heat.

Now, on to the chicken!  The meat tenderizer was at Justin's place, so instead of pounding out our chicken breasts, he cut them into thin cutlets, and simply breaded them in pan searing flour, salt and pepper.
These just got pan fried in some melted butter and olive oil until they were cooked through.  To keep them warm and crispy, we placed them on cooling racks on a baking sheet and put them into a warm oven.  Keeping them elevated on the cooling rack lets the air circulate underneath and keep them crispy on all sides.
For the sauce, we used the same pan we cooked the chicken in, and just added a little more butter, white cooking wine, some water (or you could use chicken stock), and a little lemon juice.  Since we had some dill and thyme on hand, we added that to the pan as well, for a little extra flavor.
Once those flavors had a chance to meld together, we added a little flour to thicken it up, as well as the capers for some saltiness.  And that's it!  Super simple, and only used a couple pans.  What more could you ask for?

December 21, 2012

Holy Cannoli!

We'll keep this one short and sweet.  Short, since I can link to past posts for the dinner portion, and sweet since we made cannolis!

We got another spaghetti squash from the CSA last week, and we have some leftover meatballs from a past dinner, so that's what we threw together tonight.  Here's our spaghetti squash and meatball how-to.  We did have to make some sauce, so we made a puttanesca-esque sauce.  Sweat out some onions and garlic, add baby bellas and anchovies (these were in oil with capers), toss in a can of tomatoes (preferably San Marzanos), and top with some chopped basil and parsley.  Since we had some parmesan rinds hanging out in the fridge, we threw one in to help thicken the sauce, and add a little cheesyness.  Then you can just let it simmer until you're ready to serve.  Super quick.  Super simple. Super tasty!


Now for the cannolis!  We had some leftover ricotta from our gnocchi, so what better way to use it up than by making dessert?  Honestly, I'm not much of a baker.  I don't have the patience to precisely measure each ingredient, and sift things.  Plus, I tend to gravitate towards salty snacks over sweets.  I prefer the creativity of cooking, where I can add a splash of this and a dash of that until it tastes right.  I leave the baking to my mom.

They took a little more time and work than we thought, but we pushed through!  While Justin manned the sauce, I prepped the cannolis.  For the dough, all you need is flour, salt, sugar, an egg, and some dry white wine.  The only white wine I had was some delicious chocolate flavored wine I'd picked up a couple years ago at the Virginia Wine Festival (If you've never gone, you should definitely check it out!).  We thought it'd add a nice subtle chocolate flavor to the shells.

Once the dough was wrapped up and in the fridge to rest, I moved onto the filling.  I let the ricotta drain for a bit, and then added powdered sugar, cinnamon, nutmeg (since I didn't have allspice), grapefruit zest (since we didn't have a lemon) and some whipped cream (you just need soft peaks when you're whipping the cream).  This sat in the fridge to set up while we ate our sketti squash and meatballs.

Once we were through with dinner, it was time to make cannolis!  Not to be confused with this guy.  We floured the counter and rolled out our dough while the oil heated up.  Its best to get the dough really thin.  We used the bottom of a bowl as our stencil, and cut out circles of dough.  Each circle was wrapped around a little wooden dowel that we found and dropped into the hot oil.  It only took a minute or two for them to fry up, but we got into a groove and knocked out the shells. 

Since we had some extra mint in the fridge, we chopped some up and added it to the filling for a little fresh, brightness.  I made my own pastry bag by dumping the filling into a big ziploc bag and cutting off one of the corners.  This will let you easily pipe the filling into the shells.  Once they had cooled down and were easy to handle, each shell was filled with the ricotta mixture.

During one of our last trips to Trader Joe's, we were roaming the aisles and came across a spice grinder that contained sugar, coffe and chocolate.  We looked at each other, wide-eyed and bushy-tailed, knowing we had to get it.  And what better use for it than to top our cannolis?  We ground some into a little dish and dipped each end of the cannoli into the delicious powder.
It really tied in the chocolate wine that was in the shells, and brought out the cinnamon and nutmeg that were mixed into the filling.  Ok...so maybe this post wasn't as short as I thought it would be, but it certainly was sweet!

December 6, 2012

Little Pillows of Deliciousness

aka gnocchi!  This was the 3rd share in a row that we got butternut squash and sweet potatoes, and we were getting a little tired of sweet potato fries and butternut squash soup.  Well...as tired as you can get of sweet potato fries.  Let's be honest...I won't turn them down if they're sitting on a plate in front of me (especially with sriracha ketchup), but I was ready to mix things up.  So we opted for sweet potato and butternut squash gnocchi, since we had some leftover vodka sauce.

First things first: its roasting time!

We threw the butternut squash, sweet potatoes and some garlic.  Then we tossed them in the food processor to puree them up.  That wasn't working out too well for us, so we switched to an immersion blender, probably one of the best inventions ever.

From here we added some ricotta, egg yolks, melted butter, and flour.  I think our ratio of sweet potatoes to butternut squash was out of proportion, so the dough was a bit sticky, but it was nothing a little bit of flour couldn't fix.  Ok, maybe it was more than a little bit.  Once everything was pureed, mixed, and super smooth, we started kneading.  Here's where things got a little bit messy...
Here's where we had to really add the flour so it wouldn't stick to our hands or the counter.  I took my turn at kneading the dough, and we were both too much of a mess for additional pictures.  So just imagine flour all over the counter, and dough stuck to our hands.  After lots of additional flour added to the mix, we finally had the right consistency, and we could start rolling out the dough into long, thin logs, then pinched them off into pillows of deliciousness!
We let them sit in the fridge overnight to dry out a bit.  So all that was left to do last night was boil some water, heat up our vodka sauce, and make a delicious little salad to accompany the gnocchi.
They came out a little heavy and doughy...probably because we had to add so much flour.  You're probably better off with a 2:1 ratio of sweet potatoes to butternut squash.  I think we were closer to a 1:1 ratio, leaving us with really sticky dough.  As much as we'd like to make a perfect meal every time, it doesn't always happen.  Womp, womp!