If you're like us, you've probably spent the week after Thanksgiving eating nothing but leftover turkey and side dishes. In an effort to not just recreate our Thanksgiving dinner plates, we got creative and turned our leftovers into turkey pot pies!
We started by quartering a few potatoes and peeling a few leftover carrots, and popping them into the oven to roast them for about 15 minutes. Since they typically have a longer cook time, roasting them first helps minimize the time your pot pies need to be in the oven. Plus, it gives them a nice roasty flavor.
While those are roasting, you can make your dough to top your pies. We kept it simple by combining 1 cup of flour with 1 cup of chilled butter, and a splash of vodka. Try not to overmix the dough, as you want the butter to stay as cold as possible. Once our dough came together, we wrapped it in some plastic wrap, and stuck it in the freezer to get it cold again. This will help give you a nice, flaky crust. If you're making your dough in advance, you can just keep your dough in the fridge.
Once the dough was chilling, we started building our pies. We chopped up some fresh onion, and dropped them into our little bowls. Then, each bowl got a healthy spoonful of our leftover green bean casserole.
Then we chopped up some turkey meat, and added those to each bowl. At this point, the potatoes and carrots were also done, so we chopped those into smaller pieces and tossed them in the bowls as well.
The one thing that was missing was a bit of a gravy. So we added in a few spoonfuls of our turkey stock, as well as a splash of milk. Then give everything a little toss and turn in the bowl so it's all mixed up and coated in the stock and milk.
Then, just role out your dough, cut it into circles wide enough to top your bowls. Make sure you cut slits in the top to so the steam can escape (clearly the 2 on the right were our first crusts). You also want to beat an egg and brush each crust with the egg wash. This will give you a nice, golden brown crust.
Be sure to place your pies on a baking sheet to catch any gravy that may spill out of your pies. Pop them into a 350 degree oven for about 15 minutes, or until your crusts are cooked through, and golden brown.
The crust was buttery and really flaky, almost like a biscuit. It was the perfect topper for our pot pies, and a great way to repurpose our leftovers.
Showing posts with label green. Show all posts
December 10, 2013
December 2, 2013
This is How We Casserole!
One of my favorite Thanksgiving dishes is green bean casserole, so when Justin and I were developing this year's menu, I was pretty adamant about including it. Turns out it's really easy to make a dressed up version of the traditional dish. We used this recipe as a guide, and were on our way!
Instead of using the standard, canned fried onions, we decided to fry up some shallots. We thinly sliced 4 shallots (which you can do ahead of time, though it made our fridge smell like onions), and they were ready to be fried. The beauty here is that you don't need to make a batter or coat them in flour. Just heat a pan with some oil, and drop the shallots in. Be careful not to drop too many shallots in the pan at once. They crisp up pretty fast, and you want to be able to pull them all out before they burn. Once your shallots are fried, you can set them aside while you cook up the rest of the dish.
Bring a big pot of water to a boil, and drop in your green beans or hericot verts, just to blanche them. Make sure you have an ice water bath ready, so as soon as you drain your beans, dump them into the ice bath to stop the cooking process.
While that's happening, you can whip up your creamy mushroom sauce. You want about 3/4 lb. of mushrooms. Just get whatever kind of mushrooms you like, and slice them into bite sized pieces. For our casserole, we went with shiitakes. Melt some butter in your pan, and saute your mushrooms.
When you first drop your mushrooms into the pan, season them with pepper. You'll see the mushrooms first release their liquid, and then reabsorb them. When they've reabsorbed them, that's when you season them with salt.
Once they cook down, you'll sprinkle them with a couple tablespoons of flour. Toss them around so the mushrooms are coated. The flour will start to form a bit of a paste, but this will help to thicken your sauce. Once the flour has cooked down a bit, add in your vegetable or chicken stock and some heavy cream. You want a 3 to 1 ratio of stock to cream, so depending on just how saucy you want your casserole to be, you can adjust accordingly. I don't like my beans to be swimming in sauce, so we stuck with 1 1/2 cups of stock, and 1/2 cup of heavy cream. This was the perfect amount of sauce for about 1 1/2 lbs. of beans.
Stir everything together and let it simmer until it thickens. Once your sauce has thickened, you can toss in your beans. You want to make sure they get evenly coated in the sauce.
Then pour everything into your baking dish. Make sure you transfer all of the sauce into your dish too. Top it all with your fried onions, and pop it into the oven for about 15 minutes.
You want the green beans to heat up again, the sauce to be bubbling, and the onions to really crisp up again. This from-scratch version of green bean casserole doesn't require much more effort than the traditional dish, plus it's a bit healthier since you know exactly what's going into it. You can pick your mushrooms, and you're not getting all that extra salt or preservatives from the canned mushroom soup and fried onions. Not to mention, it tastes extremely delicious!
Labels:
beans,
broth,
casserole,
chicken,
cream,
fried,
green,
hericot verts,
mushrooms,
shallot,
shiitake,
Thanksgiving
September 8, 2013
Doi Moi
We recently visited Doi Moi, and having visited Vietnam, I had high expectations for the food. When you first walk in, you're greeted by a bright, inviting space. It's a stark contrast to it's sister restaurants, Estadio & Proof, which are filled with dark wood and low lighting. I immediately noticed the delicious smells coming from the open kitchen, and knew we were in for a treat!
Source |
Source |
Source |
We were still a bit hungry, so we decided to try the roasted half chicken, which we'd seen several other tables order, along with a beef dish and pork skewers. If you're going to order the chicken (you definitely should), I'd recommend doing so towards the beginning of your meal because it takes 30-40 minutes to cook. It is well worth the wait. The skin is perfectly crisp, while the meat was still juicy and tender. The sauce for the chicken was a bit too acidic, and it was somewhat of a shame to dip perfectly crisp chicken skin in any sauce. The beef had rich flavors of soy and ginger, and came with shark sriracha, the Thai version of sriracha (we were kinda hoping that it was sriracha seasoned with shark fin or something). It's basically the same as the one we're accustomed to with the rooster on the bottle, although thinner in consistency and a tad bit sweeter. The pork skewers were equally delicious, served with a crunchy peanut sauce. The sauce was so good that I ended up dipping some of the chicken in it.
Source |
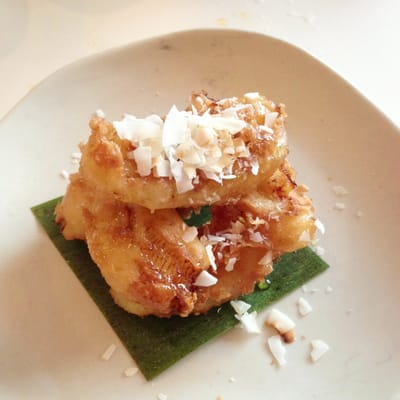
We finished off the meal with the fried bananas and a couple of iced coffees. The bananas were steaming hot with a thin, crisp batter, and toasted, shave coconut sprinkled on top. The banana had a nice sweetness to them, and I loved the fresh coconut. The iced coffees were also great, and although they had sweetened condensed milk in them, they weren't cloyingly sweet.
A few of the dishes lacked some heat, but maybe they're trying to cater to a more western palette. Overall, it was a great meal, and I will definitely go back to try the rest of the dishes on the menu.
Subscribe to:
Posts (Atom)