Showing posts with label garlic. Show all posts

February 16, 2014

We Can Pickle That!

I know it's been a while since we've posted anything, but once again, work and life has gotten in the way.  We've been sticking to old standby recipes that we can whip up in a flash.  Plus, the polar vortex has limited the amount of produce we've been receiving in our share, so we haven't had much to work with on that front either.

Nonetheless, we've got a quick an easy way to spice things up during these cold winter months.  A few months back, we got a bunch of jalapenos in our share.  With no immediate use for them, we decided to pickle them, following this recipe by Michael Symon.

Start by poking a few holes in each pepper, and placing them in your jar.  This will allow the brine to get inside the peppers, and pickle them from the inside out.
For your brine, bring to boil equal parts water and vinegar, some sugar and salt (in equal proportions), and your aromatics; bay leaves, whole coriander seeds, a few garlic cloves, and black peppercorns.  We didn't have any peppercorns on hand, so we just used our coarse ground black pepper instead.  We also didn't have whole coriander seeds, as the recipe called for, so we used ground coriander.  That's why our brine looks a bit muddy.  We also decided to throw in some mustard seeds for good measure.
Once your brine begins to boil, turn down the heat, and let it simmer for about 5 minutes.  Pour the brine over your peppers, place the lid on, and let it cool.  Once cooled, put them in the fridge, and let the brine work it's magic.  Let them sit in the fridge for about a week before using them.  This will give the peppers time to pickle.
Then you can slice them up and serve as you see fit.  Ours have a nice sweetness to balance out some of the heat.  They're great on top of nachos or tacos.

January 5, 2014

Everybody Loves Ramen!

We've had some cold weather around these parts, and a freezer full of turkey meat and turkey stock. So to kill two birds with one stone and use up our turkey, and warm our bellies, we decided to try our hand at making our own ramen.  We transformed this American fall classic into a Japanese-influenced cold weather delight.

To our basic stock, we added some mirin, garlic, soy sauce, and some white pepper.  Since our stock was pretty thick, we also added some water to give it the right consistency.  Let it simmer and reduce to about half.  We also threw in some of the shredded turkey we had on hand.
Once your broth has reduced, throw in your noodles.
Once they started to soften, we added in our chopped baby bok choy and some sliced scallions.  We wanted to keep some crunch to the bok choy, so we added them at the end.  If you want them to soften more, you can add them earlier.
Once the noodles are al dente, you're ready to serve!  We topped our ramen with some strips of nori for some added umami punch.
It was a nice and hearty bowl of soup, perfect for a cold winter's day!  It was a great change of pace from other turkey leftovers, and the flavor was comparable to the real thing.  Look for us to try a more traditional tonkotsu ramen in the future.

November 6, 2013

You Say Tomato, I Say Yum!

With the colder weather settling in, we've been making a variety of soups lately.  Since we had some heirloom tomatoes from the share, we decided to make a Fall version of our summer tomato soup and grilled cheese picnic.

We started by sweating out some onions and garlic in butter.  We also threw in a sprig of thyme and a bay leaf.  You can just throw the whole sprig in there.  The herbs will fall off the stem as it cooks, and then you can just pull out stem.
While the garlic and onions were cooking down, I quartered the tomatoes.  It doesn't matter how you cut them, though the smaller you the cut them, the faster they'll cook down.  
We added them to the pot, along with about half a can of San Marzano tomatoes, and some tomato paste.  As the fresh tomatoes start to cook down and soften, you can squish them with your spoon or potato masher.
Be sure to season your soup with salt and pepper.  We also added in some dried parsley and Italian seasoning since we didn't have any other fresh herbs on hand.  Let the flavors cook together for at least 10 minutes.  Then we just used our immersion blender to puree the soup and give us a nice, smooth consistency.
Once it was pureed, we let it simmer on the stove while we assembled our grilled cheeses.  We used a combination of manchego and gouda, along with a few slices of soppressata.  To help melt the cheese, cover your pan with a lid to create some steam.
It's a quick and delicious meal for those cool Fall nights.
And don't forget the best part...dunking your grilled cheese in the tomato soup!

August 27, 2013

Two Hungry [Artichoke] Hearts

We were watching Sandwich King the other day on Food Network, and Jeff was whipping up a grilled artichoke sandwich with a roasted garlic ricotta spread.  All of the components sounded great, so we took them, and morphed them into a delicious grilled salad.

Start by roasting your garlic.  It takes about at least 30 minutes for it to roast, so you'll want to start with this step so it can caramelize and soften while you prepare everything else.  I peeled away some of the outer layers of the garlic skin first.  Then, you'll want to slice off the top of the head so the cloves are exposed.  Drizzle olive oil over the top, and sprinkle on some salt and pepper.  Wrap up the garlic in foil and place it in a 350 degree oven for 30 minutes, or until it is fragrant and soft.

While the garlic is roasting, you can start preparing everything else.  We wanted to make the salad a little more hearty, and we had a couple chicken breasts on hand, so we simply seasoned with salt and pepper and a little oregano, and threw them on the grill.  The romaine heart was quartered, and a whole can of quartered artichoke hearts were drained.  The romaine, artichoke hearts, and a red bell pepper all received a liberal brushing of olive oil, and sprinkle of salt and pepper.  Then we threw them on the grill.  The romaine and artichokes only took about 5 minutes, while the pepper took about 10 minutes.  You want the pepper to get nice and charred so you can easily peel the skin off.

Once they've cooled down enough for you to handle, give your romaine a rough chop.  Peel the skin off your pepper, and slice it into thin strips.  Add this all to a bowl with your grilled artichokes.  For some freshness, we tossed in some mixed greens and thinly sliced red onion.  You can also toast up some pine nuts to top your salad, for some added crunch.  Now just plate your salads, and add the sliced chicken on top.  For dressing, we just drizzled some balsamic vinegar over the top.

Now, don't think I forgot about our roasted garlic.  When it's soft, and sweet smelling, pull it out of the oven, and squeeze out your cloves.  They should be a golden brown, and nice and soft.  Using the side of your knife, you should be able to smoosh the garlic into a paste.  You can add a little salt to add some coarseness and help  assist you in making the paste.  Then just add your garlic to a bowl with ricotta, parmesan, and lemon zest.
Mix it all together so it's well mixed, and you're ready to spread it on some crostini, topped with fresh basil.  The velvety ricotta with the sweet roasted garlic was the perfect compliment to our grilled salad.

July 18, 2013

Outdoor Flicks & Picnics!

As you may have seen on Facebook last night, we had a delicious summer picnic spread that we enjoyed while taking in an outdoor movie (if you didn't see it, you should "Like" our Facebook page!).  One of the things I love about summer in DC is that on any night of the week, you can see an outdoor movie.  Most neighborhoods are jumping on the wagon, and you're sure to find at least 1 movie each week that you want to see.  As foodies, we had to go above and beyond a bucket of fast food chicken or prepared food from the grocery store.  We prepared an awesome spread for movie without going overboard like this:
One of the things I'm not a huge fan of when it comes to summer in DC, is the sweltering, humid weather.  As soon as I step outside, I feel sweaty and gross, and the last thing I want to do is stand over a stove, or in front of a hot oven.  The perfect solution is a cold soup!  And since we picked up a ton of tomatoes in this week's share, gazpacho was the natural choice.

For a little guidance, we found this recipe.  As always, we put our own spin on it.  But to get you started, gather all your veggies, a good knife, a big bowl, and get to chopping!  Make sure you collect all the seeds and juices that may leach out from your veggies as you're cutting them.  That will help thin out your soup.  I left the skins on all of the veggies, except for the cucumber.  He was the only guy that got peeled.  Because we're both huge fans of garlic, we added about 5 cloves.  And since we had a jalapeno on hand, we chopped that up, as opposed to using hot sauce, as the recipe called for.


Once you're done chopping, you'll have this beautiful bowl of fresh summer veggies!  The recipe instructs you to just get your hands dirty, and squish all the veggies together, but I don't think that's an ideal method, considering the peppers and onion aren't as soft as the tomatoes.  Plus, we wanted more of a soup consistency, as opposed to a chunky salsa consistency.  So I pulled out the immersion blender and got to work.  It didn't take long to break down all the veggies either.

Here's where you really need to taste and add seasonings, as needed.  I started with salt, pepper, and juice of half the lemon.  I started out conservative on the lemon but ended up using the whole thing.  Give it another whirl with the blender, and taste again.  If it's not spicy enough, add another jalapeno, or a splash of hot sauce.  I also threw in the balsamic and red wine vinegars, olive oil, and a splash of worcestershire sauce to balance out the sweetness of the tomatoes.


To top it all off, we threw in a bunch of fresh cilantro and parsley.  Again, blend it all up and taste it to make sure the flavor is right where you want it.  Then just pop it in the fridge to chill until you're ready to eat.


No tomato soup would be complete without a grilled cheese sandwich to go with it.  But we couldn't just go with any ol' grilled cheese.  We had to step up our game for all of you! So we chose a nice baguette for our bread, some prosciutto, humboldt fog cheese, and some arugula.

As with any other sandwich, just start building.  I failed to put cheese on both sides of the bread initially, and they wouldn't stick together, so it's in your best interest to do this right off the bat.  The humboldt fog is a mold-ripened goat cheese, but it has a little less tang and a little more smokiness than a typical goat cheese.  It's somewhat soft and crumbly, but it was easy enough to spread on the bread, and melted into the meat and arugula.  With your sandwiches assembled, melt some butter in a pan, and get to toasting!
If you're packing these treats up for a picnic, let the sandwiches cool down a bit before wrapping them in foil, or putting them in a plastic container.  You don't want them to sweat and get all soggy.

All that was left was to pop some popcorn (truffle parmesan popcorn, that is!), throw a couple beers in the cooler, and a couple peaches for dessert!

July 16, 2013

That's a Dilly of a Pickle!

Hi diddily ho bloggerinos!    We're both huge fans of pickles, and since we got a few kirby cucumbers in our last share, it seemed like the perfect time to try to make them. We searched the interwebs for some recipes and settled on this one and this one, plus we added a few of our own spices.

Start by washing your cucumbers, and making sure they don't have any dirt on them. Since our jars are still full of kimchi and saurkraut and we don't have canning supplies, we just used a plastic container with a lid.  Any airtight container should work, as long as it's been sterilized.

For the pickling liquid, we mainly followed Alton Brown's suggestions...mixing up a brine, though we did add a splash of vinegar.  For spices, we roughly chopped up about 6 cloves of garlic, and added in red chili flake, mustard seeds, carraway seeds, black peppercorns and a whole bunch of dill.
Once your spices are in your container, stuff your cucumbers in there.  You want to make sure they are nice and snug in the container.  Then, pour in your brine so the cucumbers are completely submerged.  If the cucumbers are nice and snug, they're less likely to float to the top when you pour in your brine.  Then just place your lid on the container, and make sure you get as much air out of it as possible.
Now you'll have to be patient, and let your cucumbers pickle.  Store them in a cool dry place.  We just placed ours in one of the kitchen cabinets, away from the stove.  After about 3 days, you'll notice bubbles rising to the top of your container.  This is proof that fermentation has begun, and you're on your way to having pickles!  If you notice any scum forming in the top of your pickling liquid, wipe it off immediately.  We noticed some white film on one of our pickles, so we wiped it off with a paper towel that was soaked in a little vinegar.

Fermentation should be complete in about 6-7 days, once the bubbles stop rising and your pickles taste sour.  Then transfer them to the refrigerator, and start to enjoy them!  If any of the pickles get soft or start to smell funny, you should discard them.  Ours came out nice and garlicky, with a slight heat to them.  They're the perfect snack or or sandwich companion!

July 8, 2013

It's Smooooookin'!

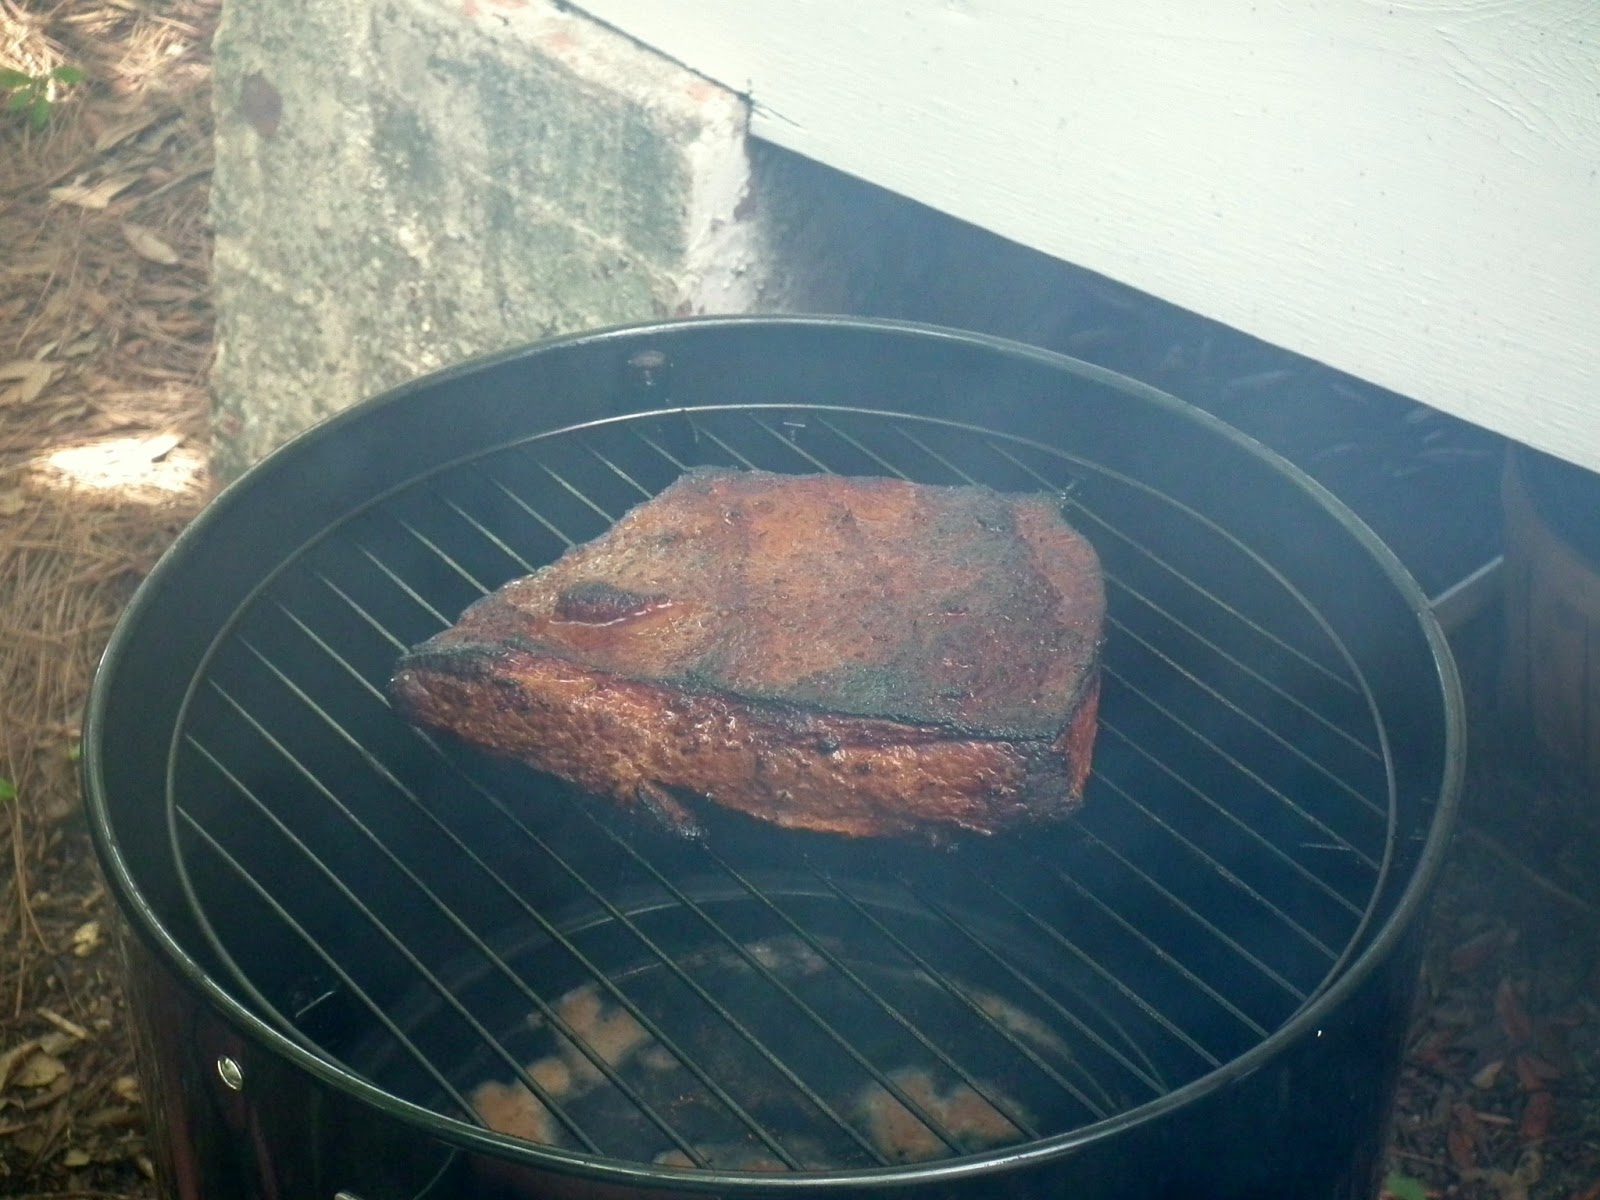
4th of July wouldn't be complete without throwing something on the grill or in the smoker, so we did just that.    We fired up the smoker with cherry and hickory wood chips, and got it nice and warm for our brisket.  For our smoking liquid, we filled the pan with a mixture of water and beer.  While the smoker heated up, we prepped our brisket.  We started with a dry rub, consisting of all these tasty spices:
R to L: black pepper, thyme, red chili flake, garlic powder, brown sugar, paprika, mustard powder,  chili powder, salt, white pepper, cumin
We really just poured and mixed until it tasted great.  We ended up with about 1.5 cups of the spice rub, which was plenty to rub on the brisket and add to the sauce, while still having extra for next time.  Our rub had a subtle heat that came at you from the back.

We poured a bit of vegetable oil on the brisket, and rubbed him down with our spice mixture.  Be sure to massage it in to help tenderize the meat too.
Then you're ready to throw it on the smoker.  As it cooks, make sure to periodically check on it.  We didn't have a sauce mop, but we did have a squirt bottle with some apple cider vinegar, Worcestershire, and a dash of soy sauce and liquid smoke,  which we used to keep the meat moist and give it a bit of added tang.  We put our meat on fat-side up.  Conventional wisdom from the pit dictates that by smoking fat side up, the delicious beefy drippings permeate the meat and wash over it as you baste it.
Now with good BBQ, the meat should be the hero (aka Michael Jordan), but a winning sauce is like your Scottie Pippen and Dennis Rodman; they provide some flavor and allow the star to shine.  If you've been following along, you'll know we're huge fans of Dinosaur Bar-B-Que.  They make the most amazing brisket I've ever had.  It just melts in your mouth!  So we turned to them for inspiration on the sauce, and found a recipe online for a variation on their wango tango sauce.  We started by mincing up the onion, peppers and garlic.  You could use a food processor to get tiny pieces, but I like chopping by hand.  In this step, we substituted an anaheim pepper for the green pepper, and we used 2 habaneros so as not to overpower the sauce with spice.  We also toasted up some mustard seeds before adding in the peppers and onions to saute.
Once the peppers and onions had cooked for about 15 minutes, and really softened, we added in the garlic. While that's all cooking down, we mixed together the remaining ingredients.  We stuck pretty close to the recipe, but used slightly less ketchup, added a couple shots of bourbon, and a few tablespoons of our dry rub.
Just pour the wet ingredients into your onion/pepper/garlic mixture and let it simmer for about 15 minutes. Bring it to a boil, add in your liquid smoke, and let the sauce do its thing. The flavors really developed the longer the sauce simmered.  It has a nice heat and sweetness to it, without being overpowering.
Now, for the hard part...the waiting! A general rule of thumb for smoking time is about 1.5 - 2 hours per pound of meat.  We had a nice 3 pound brisket so we had it cooking for about 5 and a half hours.  You'll often hear about people smoking meat for 18 hours, and there is much debate in the BBQ community about this, but they use hunks of meat the size of a chevy suburban.  The important part is to get a nice piece of meat with a uniform fat cap on it.  If your smoker has a thermometer, try to keep your temperature at about 220-250 degrees.  You'll know it's done when the meat is firm and has a nice smoky crust on it.  Then just let it rest for at least 5 minutes, and slice it up.
Then toast up some buns and start piling on the meat!  For sauce, we used some of our wango tango-inspired sauce, and also mixed some in to our vinegar basting liquid to have a vinegar-based sauce as well, to keep things NC-style.  To round out the meal, we baked up some sweet potato fries, grilled up some asparagus and corn, and make some jicama slaw.  We'll be back later this week with details on the slaw and corn.