Showing posts with label Polyface Farms. Show all posts

August 8, 2013

Fun With Buns!

We're both big fans of burgers, and we thought it was about time we try our hand at making some brioche buns to go with our summer cook-out favorites.  You know by now that we're not into baking as much as we are cooking, but if we're ever going to improve so we have a shot at winning MasterChef, we need to practice!  You can't discount the importance of the bun to a good burger.  While some opt for potato, kaiser, or Portuguese rolls, nothing really makes a burger like a light, airy, malty, perfectly browned brioche bun.

We found this recipe online, and since we'd had some success with Smitten Kitchen recipes in the past, we knew she wouldn't steer us wrong.  Start by mixing together warm water, milk, yeast and sugar, and let it stand for about 5 minutes.  The warm water helps activate the yeast, while the sugar acts as food for it.  After about 5 minutes, this mixture will be foamy, and ready to mix into your dough.

While your yeast is standing, you can start to mix your dough.  For the dry ingredients, whisk together your bread flour, all-purpose flour, and salt.  Rub the butter between your fingers, and mix with the flour mixture, forming crumbs.  Ours didn't really form crumbs, per se, but once the butter was incorporated as much as it could be, we added the yeast mixture and a beaten egg.
We don't have a dough scraper, so we just used a rubber spatula to mix the wet and dry ingredients together.  Within minutes, we had a nice ball of dough.
Here's where some of the manual labor comes into play.  On a floured surface, you'll have to knead your dough.  We followed the recipe, which suggested using a scooping/slapping method.  You scoop your dough up from the counter and then slap it down.  In 8-10 minutes, it should be smooth and elastic.  Be careful not to add too much flour to the dough, as this will leave you with tougher buns.  Our dough was a bit tackier than it probably should've been, but we didn't want tough buns.  Once you've kneaded your dough, place it back in the bowl, cover with plastic wrap, and let it rise until it doubles in size.  This took about an hour for us.
Once your dough has risen, divide it into 8 sections.  We only made half the recipe, so we ended up with 4 buns.  Roll them into balls, and place on a baking sheet lined with parchment paper.  Spray some plastic wrap with some nonstick spray and loosely cover your buns to let them rise again.  We didn't have any nonstick spray on hand, so I just brushed a little vegetable oil on it.
Like I mentioned earlier, our dough was still fairly tacky, so it was a bit difficult to roll them into balls.  Instead we shaped them as best we could, and let them rise again.  When you're ready to bake, place a dish of water in the bottom of your oven, and heat the oven to 400 degrees.  Beat another egg and brush it on top of each bun, and if you want to add sesame seeds, do that now.  Pop 'em in the oven, and let them cook for about 15 minutes, or until golden brown, turning the pan about halfway through.
And voila!  Golden brown buns!  Let them cool completely before you cut into them.  At first, they seemed kind of tough on the outside, but once they cooled, and we cut into them, they were pretty light and fluffy on the inside.

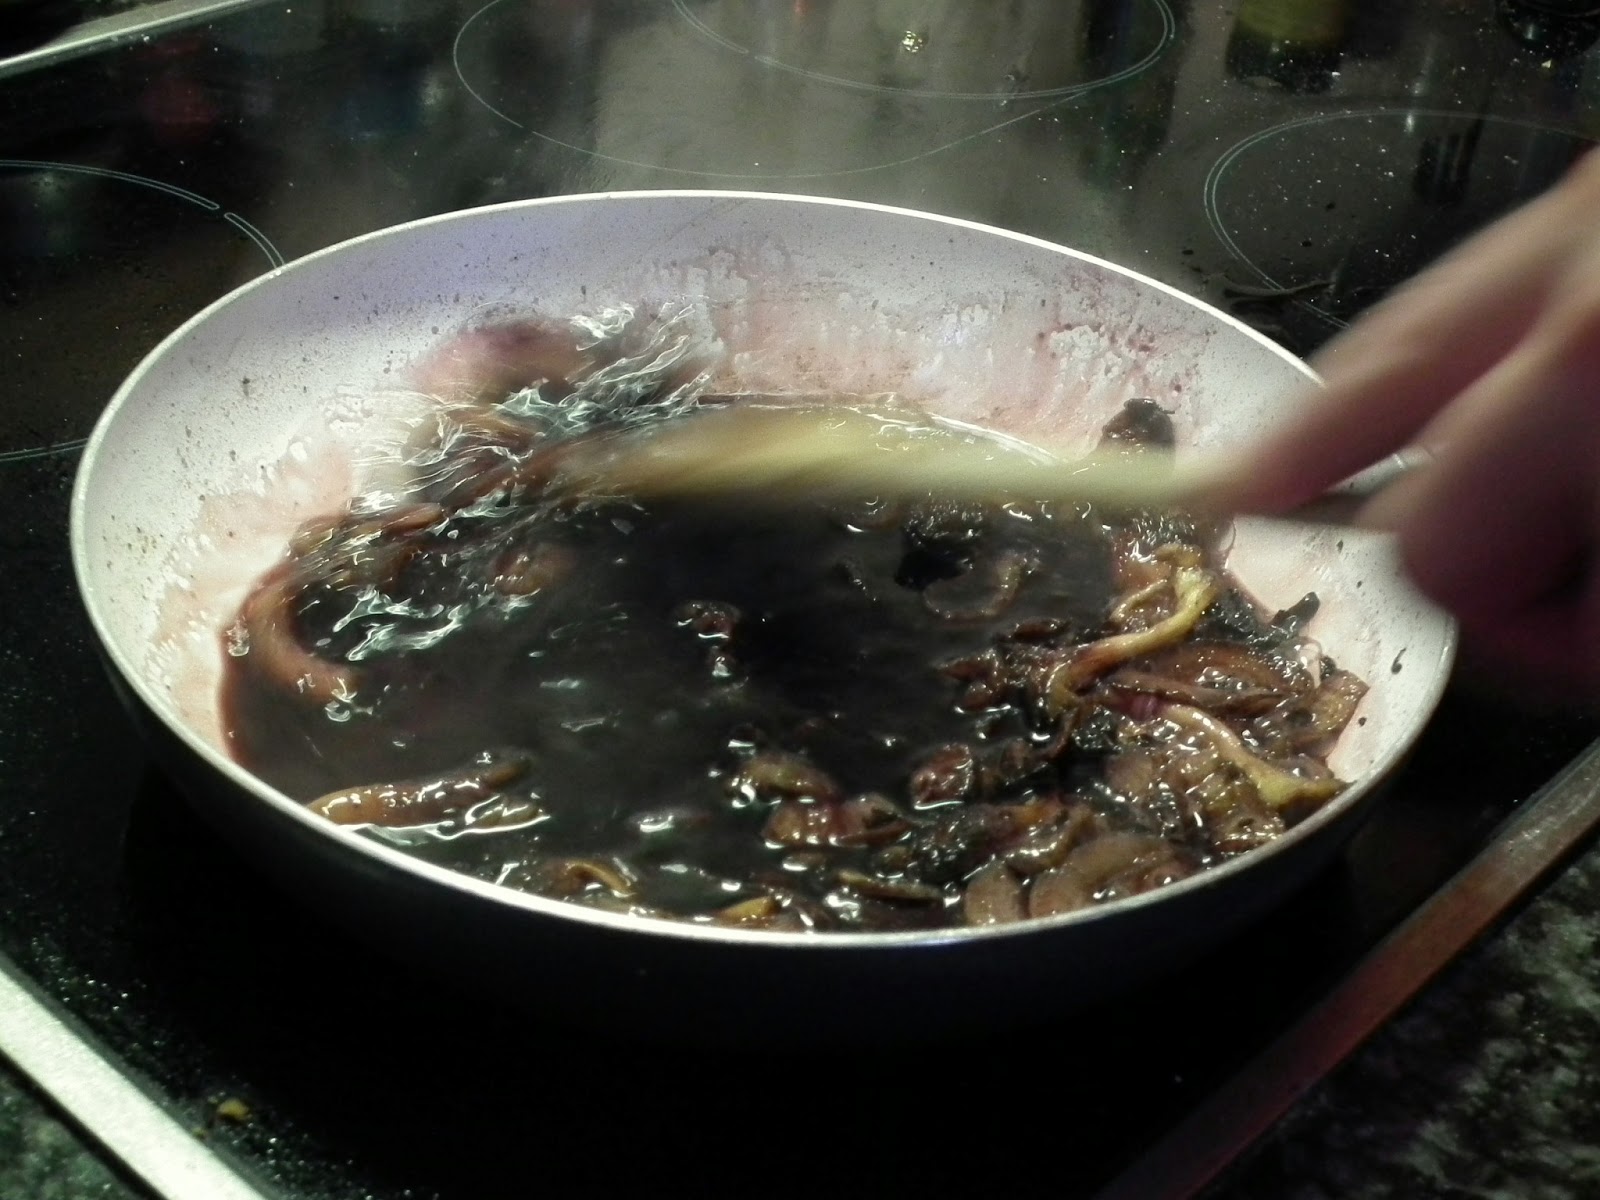
For our burgers, we used Polyface Farms ground beef from our share, and simply seasoned them with salt and pepper.  We had some humboldt fog leftover from our grilled cheeses, that got nice and melty on the warm, grilled burgers.  We also caramelized some onions with port wine that topped the patties, along with some fresh arugula.  Add one of our dill pickles, and we had the perfect burger.

June 16, 2013

I Pity the Moule[s]


Now that you're pumped up and ready to go, let's talk about the other kind of mussels, or moules, as they are called in French and Belgian cuisine.  Tonight's meal was inspired by my co-worker who made mussels the other night.  They looked so good, that we had to make a pot of our own.  The nice thing it, it's a simple, one-pot meal that you can make any night of the week.

Start by cleaning and scrubbing your mussels.  You want to make sure you get all the grit and sand off the shells.  Otherwise, it'll end up in your broth.  Then we sliced up some bacon and crisped it up in the pot that we made our broth in.  Once the fat rendered out, and the bacon was crispy, we removed the bacon from the pot and kept it to the side for later.  Now, our bacon was pretty salty, so as we built our broth, we really didn't have to add any additional salt, but just taste as you go, and season accordingly.

Our bacon was also pretty lean, so we added a bit of grapeseed oil to the pot of bacon fat.  Once it was up to temp, we tossed in our minced garlic and shallot.  Once they softened, we added in some sauvignon blanc to deglaze the pot.  Make sure you scrape up all the tasty bits from the bottom of the pan when you add the wine.
Then just let it simmer and reduce down.  We added some freshly cracked pepper, and a bit of water because it was tasting a bit salty.  Just before you add your mussels, toss in your tomatoes.  You want them to cook down a little, but not completely.  

Toss in your mussels, place a lid on the pot and let them steam for about 3 minutes.  Give the pot an occasional shake so all the mussels can be coated in your broth.  And voila!
It couldn't be any simpler.  Spoon your mussels and broth into a bowl, and garnish with some chopped parsley.  In true Belgian fashion, the meal wouldn't be complete without beer and frites.  We went with some sweet potato fries with a homemade roasted garlic mayo, and some Biere du Boucanier, a Belgian ale.

May 22, 2013

Burgers. Beets. Battlestar Gallactica.

Tonight's post is dedicated to Dwight Shrute and the end of The Office.  We're pretty sure our beets came from a farm in Virginia, but Scranton isn't too far from DC, so I guess there's a slight chance they came from Shrute Farms.


This week's share gave us some Polyface ground beef, which we are always excited for. With the warm summer weather, burgers on the grill sounded like the perfect dinner.  We still had some umami dust on hand, and since Umami Burger isn't DC yet, we had to make our DIY version.  This recipe was our inspiration.

The twist this time around was the oyster mushrooms and onions in a port reduction that topped the burgers.
It's a really simple way to elevate any meat, whether it's a burger or a piece of steak.  Start by slicing and dicing your mushrooms and onion, and saute them in some brown butter.
Once they've softened, you'll add about 1 cup of port.  Here's where you'll deglaze your pan, making sure to scrape up all the tasty bits that are stuck on the bottom of your pan.  Then just let the liquid reduce down, stirring occasionally, until you have a thick glaze on your onions and 'shrooms.
We tucked our patties into some lettuce leaves, topped them with the port 'shrooms and onions, and some crumbled bleu cheese.
Since we didn't have any sweet potatoes for fries, we decided to make beet chips again to accompany the burgers.  They're super simple, and add a sweet, crispy component to the meal.  I would advise using a mandoline to slice them, if you have one, so that each chip is the same thickness.  Otherwise, take your time slicing and use a really sharp knife.  We used the beet greens to make a simple salad for a little extra roughage.
The beet chips, along with the port, added a nice sweetness that balanced out the rich umami flavors of the burgers.
And if you use your imagination a little, doesn't my plate kind of look like Dwight?

March 8, 2013

One Hell of a Burger

With spring nearing, and a trip to the beach over Memorial Day weekend, we've decided it's time to whip ourselves into shape.  We both packed on a couple pounds over the winter, so we decided to take action!  I'm a newbie to the whole Paleo diet, and if you're not familiar, here's a simple overview of what you can/can't eat:
courtesy of dearpaleo.com
We already eat pretty well, so it shouldn't be too hard to transition to a slightly stricter Paleo diet.  We're allowing ourselves 1 cheat day a week.  This should help fuel my love of carbs.  

We had already planned on making burgers tonight, so to make it more Paleo friendly, we skipped the bun, and just placed the patty on a bed of bibb lettuce.  When trying to decide what kind of burgers we wanted to make, I thought of one of my favorite burgers in DC...Ray's Hellburger.  Sadly, the place has shuttered, but you can still try their burgers at Ray's to the Third.  Anyway...I'd always get their burger with roasted garlic, and grilled onions and peppers.  So this is an ode to Ray's Hellburger.

We started by roasting a few cloves of garlic...with a drizzle of olive oil, and sprinkle of salt and pepper, just wrap them up in foil and pop 'em in the oven.  An while the garlic roasted up, we also cooked up some sweet potato fries.  The fries got a brushing of olive oil, and a sprinkle of truffle salt, pepper, garlic and parsley.
While the garlic roasted and the fries cooked up, I got to work on the burger patties.  I chopped up a couple cloves of garlic, an mixed that with the ground beef, some truffle salt, pepper, and Italian seasoning.  We kept it really simple.
Since we had some peppers, onions, and mushrooms left over from last week's steak sandwiches, we warmed those up to top our burgers.  They were simply seasoned with a bit of salt and pepper.
As the components cooked up, we started to build the burger.  The burger went on top of the lettuce, we spread the roasted garlic on the burger, and then topped it with our peppers, onions, and mushrooms.
The crowning jewel was the fried egg on top!
The yolk was nice and runny, and since we held off on condiments, it provided a nice "sauce" for everything. An honestly, I didn't miss the bun.  This whole Paleo thing may not be so bad afterall.

February 7, 2013

Umami So Fat!

Umami...that elusive 5th flavor...

You've likely heard all about it in those Kikkoman soy sauce commercials.  But tonight, we bring you umami burgers.  Just like the ones in LA.  And instead of fries, we went with kimchi brussels sprouts, ala Momofuku.

So let's start with the burgers.  To get the umami flavor, we finally got to use our bottarga, plus some pulverized dried straw mushrooms and nori.  With that, we mixed in a blend of white pepper, salt and wasabi that we picked up from the Asian market last week.  This gave us a salty, savory umami dust to work with.

We were fortunate enough to receive some ground beef from Polyface Farms.  If you've been following along, you'll remember me gushing about Polyface here.  We mixed the beef with our umami dust and a splash of fish sauce.  Then we just formed them into 2 patties and got them into the pan to start cookin'.
While the burgers cooked, we got to work on the kimchi brussels sprouts.  I should've kept the last beating stick...then we could've had a proper duel!
But alas...we started with some bacon...because every good dish starts with bacon.  Once it was nice and crispy, we threw the sprouts into the pan so they could roll around in the bacon fat.
Once they were seared, we slid them into the oven to roast.  After about 15min., they came out of the oven, and were bathed in some butter, salt and pepper.  We added the bacon back into the pan, along with some of our sliced kimchi.
We let all the flavors meld together for a few minutes, so each ingredient was coated in the butter, and spicy juices of the kimchi.  By the time the sprouts were done, so were the burgers.  We're getting much better with this whole timing thing!  The sprouts were garnished with a little raw carrot, and our burgers got some avocado and creasy greens.
The burgers had such a rich, salty, savory flavor, and creaminess of the avocado balanced it all out.  The sprouts were nicely roasted, with a sharp spiciness from the kimchi and a nice crunch from the raw carrots.  It was quite the delicious meal!