Showing posts with label sous vide. Show all posts

January 21, 2014

Quack & Vac

We didn't wait very long to break the vacuum sealer and immersion circulator out of their packaging to give them a whirl.  It was just too hard to resist!

We picked up a couple duck breasts for our initial test drive.  This was perfect for our test run because we've made this dish pretty successfully in the past (despite the occasional duck fat spill from substandard bags breaking).  We started by scoring the skin, and seasoning them with salt and pepper.  We also threw a couple sprigs of thyme and rosemary into the bag for additional flavor.  
Once everything was in the bag, we sealed it up.  I don't know why we waited so long to get a vacuum sealer, because this little machine is so magical.  Just slide the bag's open end into the machine, close and lock the lid, press a button, and in less than 10 seconds, you have a vacuum sealed pouch.  It couldn't be simpler! Not only will it come in handy for sous vide cooking, but it will help us better preserve our various ingredients.
We clamped out immersion circulator to the side of our stock pot, which was filled with water, and placed our ducks into the pot.  Several sources online recommended cooking duck breasts at 135 degrees for 2 hours, so that's what we went with.  We programmed our circulator, and within 5 minutes, it was up to temperature.  We popped in our duck and covered it with some aluminium foil and we were good to go.
After 2 hours, the alarm sounded, and it was time to pull out our duck breasts.  We wanted to crisp up the skins, so we took them out of the pouch, and placed them skin-side down in a hot pan.  The fat rendered out even more, and the skin was perfectly crisp.
We pulled them out of the pan, and let them rest for about 5 minutes.  You don't want to lose all those juices when you slice into it!
Cherries are a popular compliment to duck, but we didn't have any on hand.  What we did have was some extra cranberry sauce.  We just added a little butter and brown sugar, and we had a slightly tart and slightly sweet sauce!  As a side dish, we whipped up one of our favorites, the kale-sunchoke farro hash.
Sous vide is such an easy technique that leaves you with perfectly cooked meat every time.  With our new toys, it's going to be so much easier to play around with different meats, root veggies, and even eggs.

June 7, 2013

Our 100th Post!

What better way to celebrate our 100th post, than to go all out with some molecular gastronomy?  I F#*%king love science, almost as much as I do food, so why not combine the two?

Justin has been chomping at the bit to try some molecular gastronomy ever since we got our hands on some sodium alginate and calcium chloride for Christmas.  These may sound like something you'd find in a chemistry lab, but when mixed together in the right proportions, it allows you to sphere-ify liquids.  But that wasn't the only technique we tried.

On the menu, we have some sous vide duck breast with a cherry-port relish and cherry "caviar", roasted asparagus with grapefruit "snow", and some coconut ice cream with Thai tea pearls.

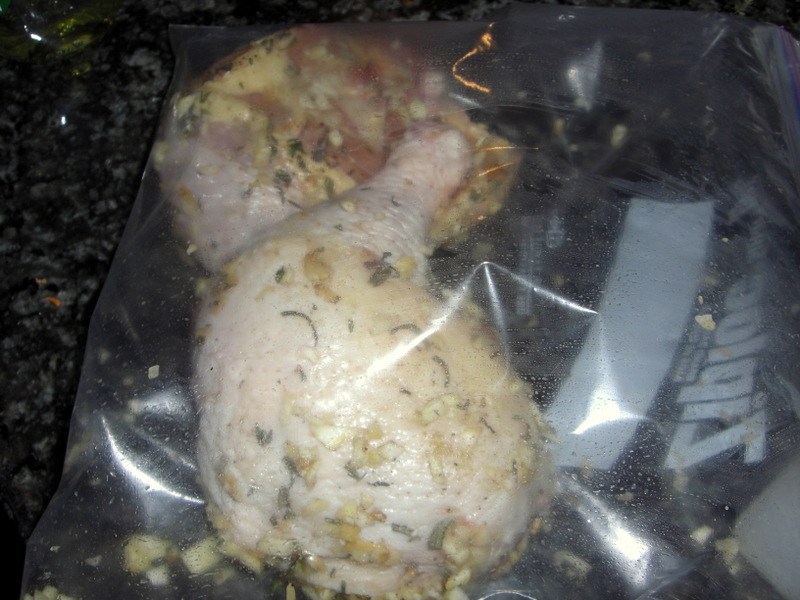
Let's start with the duck.  Start by scoring the skin of the duck, making sure you only cut into the skin and fat.  We then seasoned it with salt, pepper, and some chopped rosemary.  Place the duck in a vacuum-sealed bag, and place in a pot of water at about 135 degrees.  If you don't have a vacuum-sealer, like us, you can use a straw to suck the air out of a ziplock bag (just don't suck up any raw duck juices!).
You'll want to cook the duck for about an hour.  Once it's cooked through, we placed it in a hot pan, skin-side down, to render out the fat, and get the skin nice and crispy.

Meanwhile, we got to work on the cherry-port relish and roasted asparagus.

We used about 2tbsp of the rendered duck fat to saute our shallots, and then added some chicken broth, the halved and pitted cherries, port, and some honey.  Then you just let it simmer and reduce.
Because we were going to sphere-ify our sauce, we didn't want it to reduce too much.  We pulled about 1/4c of the liquid out of the pot, and set it in the freezer to cool.

While it was cooling, we mixed up the sodium alginate with some water.  This is the solution we'd mix with the cherry-port sauce to make spheres.  We also mixed the calcium chloride with water, which served as the water bath that we'd be dropping our cherry mixture into.  We followed the ratios found here.

Once our cherry sauce had cooled to room temperature, we added it to the sodium alginate mixture.  Then we loaded it up into a plastic syringe, making sure to get out any air bubbles.  Then just drop your sauce into the calcium chloride water bath, letting them hang out for a few minutes to really congeal.  Justin figured out a good technique for creating larger spheres; place the tip of the syringe close to the surface of the water bath, and as you push down on the syringe, move it in a circular motion.  This left us with big beads of cherry sauce.

Once they've congealed, scoop them out of the water bath and place into a plain water bath to rinse off.  Then carefully dry them on a paper towel, making sure not to puncture your spheres.

As for the asparagus, it doesn't require any chemistry equipment or strange powders.  All you need is a freezer.  You can do this step well in advance since the grapefruit needs time to freeze.  You'll need to cut the grapefruit into supremes (segments), which sounds like a really fancy technique, but it's actually quite easy to do.

Start by slicing off each end of your grapefruit.  Then, with it standing on one of the flat ends, start slicing off the rind, following the curve of the grapefruit, and doing your best to take off only the rind and pith.  You'll be left with a rind-less grapefruit.  Holding the grapefruit in one hand, start slicing out the segments.  If you're more of a visual learner, here's a quick video.  Once you have enough, just place them on some parchment or wax paper, and place in the freezer.
Rather than steam the asparagus, we decided to roast them.  So once they're cleaned, just toss them on a sheet tray with some olive oil and pepper, and pop 'em in the oven.  When they're roasted to your liking, pull them out, and place them on a plate or platter to cool.  While they're cooling, you can chop and toast up your almonds.  We also finished the asparagus with a little lemon salt, for some added citrus.  Just before you sit down to eat, grab your frozen grapefruit segments from the freezer, and using a microplane, grate them over your asparagus.

Voila! -- it looks super sophisticated, but it is really simple.  If you want to impress someone, whether it's your in-laws, a special someone, or friends, try this recipe.  It's becoming one of our signature dishes.

Now, onto dessert!

We started with the ice cream base; heavy cream, coconut milk, and some vanilla bean went into a pot to boil.  At the same time, we whisked together the egg yolks and sugar.
Once the cream/milk mixture had thickened, we tempered in the eggs.  Make sure you go slowly so you don't end up with scrambled eggs.  Once the mixture comes to temperature you can add more in all at once.  We also toasted up some shredded coconut, to be added at the end.  Next, throw your base back on the stove and let it thicken a little more, until it will stick to the back of your spoon.

Now your base should be all set.  Go ahead and let it continue to cool.  Once it will no longer create condensation go ahead and throw it in the fridge.  This basic recipe will work for regular churned ice cream, creme brulee, etc.  But we had something much more interesting in mind for 100th post.  Dry ice!  It's perfect for our purposes because it is cheaper, and colder than an anti-griddle.  Ok, we can't really say don't try this at home...but be careful if you do.  We consulted this webpage for some tips.  Honestly, it was a lot of trial and error.  Similar to the spheres, it took some experimentation to get into the groove with the technique.


First we tried sandwiching the dry ice between 2 cookie sheets, and pouring the ice cream base on top of the top tray to let it freeze.  The tray wasn't cold enough/our base was too warm, so it didn't freeze.

Next we tried placing a metal spatula on the dry ice and pouring the base onto the spatula.  Purportedly, this is how Grant Achatz experimented with it prior to opening his restaurant.  This method worked a little better, but the ice cream disc stuck to the spatula.

Then we tried pouring the base onto some freezer paper that was directly on top of the dry ice.  Again, it kind of worked, but the ice cream stuck to the paper.

Through our trial and error (and making a bit of a mess), we noticed that the drops of ice cream base that dripped directly onto the dry ice were forming nice little pearls, almost like dippin' dots.  So we resorted to pouring the base directly onto the ice.  This gave us a little more room to work with, and allowed us to get a little creative, and made various shapes and splatter designs.
We also experimented with different textures.  You may notice some brown specks in the picture above on the right.  That's the shredded coconut we'd toasted up.  As the ice cream solidified on the ice, we carefully lifted it off with a spatula, and placed it in the freezer.  If you want it to be frozen on the outside but creamy in the middle, don't bother putting it in the freezer...just eat it.  If you want it a little more frozen, stick it in the freezer while you make more.

To compliment our coconut ice cream, we made some Thai tea pearls.  We used the same method as we did for the cherry sauce, though we doubled the amount of tea for a more concentrated flavor.
The tea pearls were a welcome addition to the ice cream.  It took us awhile to get the shot for our final presentation so it didn't turn out the prettiest.  While we may not be ready to be chef de partie at Minibar or Alinea, we made food in our own kitchen that tasted nearly as delicious!  We hoped you enjoyed this as much as we had fun experimenting with some food science.  Thanks for following along for our first 100 posts, and here's to 100s more!

January 24, 2013

Winner, Winner, Chicken Dinner!

I was really excited to pick up our meat share and see that we had chicken from Polyface Farms.  I've never had any of their meat, but I've been wanting to try it ever since I read about their farm in "The Omnivore's Dilemma".  If you haven't read it, it talks about that state of food these days, and how we eat.  I'd also highly recommend picking up the follow-up book, "In Defense of Food".  Back to Polyface...they operate their farm the way a farm should run...letting their cows graze freely, and rotating them through different pastures, using their manure for their plants and produce, letting their chickens roam freely and eat bugs and worms, like their supposed to, etc.  So you can understand my excitement when I saw 2 chicken thighs and legs in this week's share.

We thought ahead (for once), and using this recipe as inspiration, decided to marinate the chicken overnight in some garlic, rosemary, thyme, all spice, salt, pepper, and a little grapeseed oil.  Once everything was in the bag, we massaged the chicken a bit to make sure they were evenly coated with the spices.
Since we're going to sous vide the birds, we had to remove as much air from the bag as possible.  And since we don't have a vacuum sealer, Justin went the old school way and used a straw...being careful not to suck up any raw chicken juices.
Sadly, we don't have an immersion circulator (maybe next Christmas?), so we just warmed up a pot of water to about 135 degrees.  We don't have a thermometer either, so we went by feel...hot enough to cook the chicken, but cool enough that you can touch it.  We dropped the bag o' chicken in the water and let it cook.
It cooked for about an hour, so while that was cooking, we caught up on some shows we'd DVR'd.  But back to the task at hand...about 10 minutes before we took the chicken out of the hot tub, I got to work on the carrots.  Our share gave us some more purple carrots, so we decided to glaze them.
Into a pan, went some butter and brown sugar.  Once it was all melty, I tossed in the carrots so they were all nicely coated.  We added in a little five spice to cut some of the sweetness, and just let the carrots hang out while we finished off the chicken.  We finished off the carrots with some aged balsamic sea salt that Justin received in his Christmas stocking.
To get that nice, brown, crispy skin on the chicken, we put it skin side down into a pan with some melted butter.  We let it sear for 5 minutes on each side to finish it off.  We made sure to dump all the garlic, spices and juices from the bag into the pan as well, and Justin continued to baste the chicken while it seared.
Since we had some parsnip and turnip puree leftover from the other night, we it off with the chicken.  It turned out to be one of the prettiest dishes we've put together lately, and one of the tastiest.

January 13, 2013

Sunday Night Steak Out

Ahh Sundays...since my Pittsburgh Steelers failed to make it to the post-season, I have even more time on my hands where I can either mope around that I have to get up early the next day or make something delicious to eat.

Today Kara and I were looking to use up few items from our last share.  Originally we were hoping to grill our steak since the weathermen promised us a sunny and 70 degree day, but yet again we were led astray by a weather forecast fail; so that was out of the question.  Instead, we decided to work around this by sous-viding our buffalo strip steak. We're not fortunate enough to own an immersion circulator, so we simply threw our vacuum-packed steak into a dutch oven filled with water heated to about 130 degrees for about 40 mins.  Once it was cooked through to a nice medium, I removed it, seasoned it with a little roasted garlic salt and black pepper, and seared it in a grill pan for about two minutes a side.
 
Next up was the kohlrabi.  We were simultaneously thinking "awesome" and "WTF?!?!" when we learned we were getting kohlrabi this week.
A brief search through the interwebs led us to this fritter recipe .  We subbed the besan for good old-fashioned flour.  One tip when squeezing out the excess water from the shredded kohlrabi...place it all in a dish towel, and just wring it out.  You'll be able to squeeze a lot of water out without losing any kohlrabi down the drain.


The fritters were pretty easy to put together...shred the kohlrabi, chop up some scallions, mix in the spices, and you're good to go!
What about those greens? Why we sauteed them with some garlic, shallot, and the rest of our spinach.
The meal was really starting to take shape, but rich steak and starchy pan-fried fritters needed to be paired with a fresh component.  Luckily, we had lettuce from our CSA and decided to throw together a little salad.  During a quick jaunt to Trader Joe's, we picked up some mini portabella caps, which we roasted with some goat cheese, and some orange muscat vinegar to round out the salad...plus some decent $2 beer to boot.
We were only missing one thing...a tasty sauce to compliment our greens and meat.  I'm a huge fan of red meat and Bearnaise sauce, and I like putting my own spin on this classic sauce by subbing the tarragon for other herbs, deglazing with liqueurs etc.  Since we had the dill, I simply used it in place of the tarragon.
It all came together quite nicely, and we truly made the best of an otherwise dreary day by relaxing with some quality food and drink.