Showing posts with label Cabbage. Show all posts

July 10, 2013

Hey--It's a Whole Lotta Jicama (and corn too)!

As promised, we're back with a quick run down on how to throw together the jicama slaw and grilled corn that accompanied our brisket for the 4th of July.  Both were really simple.

Let's start with the jicama.  If you're not familiar with it, it kind of resembles a root vegetable.  It's fairly starchy, but has the crispness of a radish, but is sweet, rather than spicy.  It's mostly common in Latin American cuisine.  In the grocery store, you'll typically find it near the onions.  Start by peeling it, and then slicing it into matchsticks.  We went with a medium sized bulb of jicama, and ended up with plenty of slaw for  the four of us.  So depending on how many people you're serving, you may want to go for a larger/smaller bulb.

Next, we chopped up some red cabbage.  I just pulled off the leaves of the cabbage, stacked them on top of each other, and got to slicing.  You'll want an equal ratio of jicama to cabbage.  You also want you cabbage strips to be about the same size as your jicama sticks, so you may need to cut your leaves in half, like I did, before slicing them into strips.

And for the red component of the slaw (could you tell we were going for a patriotic side dish?), we roasted a red bell pepper on the grill.  You'll want to throw it on the grill for about 15-20 minutes, until the skin is nice and charred, and the pepper has softened.  Pull it off the grill, and once it's cool enough to handle, you can peel the skin off.  Then just slice it into strips.

The dressing was equally as simple.  Just mix together some sour cream,
rice wine vinegar, mirin, lime juice, lime zest, cilantro, and chili powder.  I think we used about a 1/2 cup of sour cream for all those veggies.  Make sure when you mix up your dressing, you give it a taste before pouring it over your slaw.  The vinegar, mirin, and lime juice will help thin out your dressing too.  Then pour it over your slaw, and give it a good toss so all the veggies are evenly coated.  If you're like me, and you don't like your slaw swimming in dressing, gradually add your dressing to your veggies so you don't run the risk of over dressing them.

Onto the corn!  During the summer, I hate to use a lot of indoor appliances because they just heat up the kitchen.  So grilling corn outdoors is a great alternative to just steaming them on the stove.  It gives this grain a nice smoky flavor as well from browning the husks.  First, you'll need to remove the silk from each ear of corn, while leaving the husk in tact.  The best way to do this is to peel back the husk down to the base, 1 leaf at a time, until the ear of corn is exposed and you can remove all the silk.  Then you can just cover the ear back up with the husk and move onto the next ear.


In order to not burn the husks, you'll want to soak your corn in water, just like you would with wooden skewers if you were making kebabs.  This keeps the husks moist enough to not catch on fire.  When you're ready to grill them, make sure all the water has drained out of the corn, and then simply put them on the grill for about 15-20 minutes, rotating them frequently.
Once their done, and are cool enough to handle, you can remove the husks.  We then squeezed some fresh lime juice over each ear, sprinkled on some chili powder and cilantro, and topped each ear with some queso fresco.  This was our take on a traditional Mexican street food.
Both the jicama slaw and grilled corn were nice, light accompaniments to our delicious smoked brisket, and would be great for any backyard cookout this summer!

March 17, 2013

Happy St. Patrick's Day!

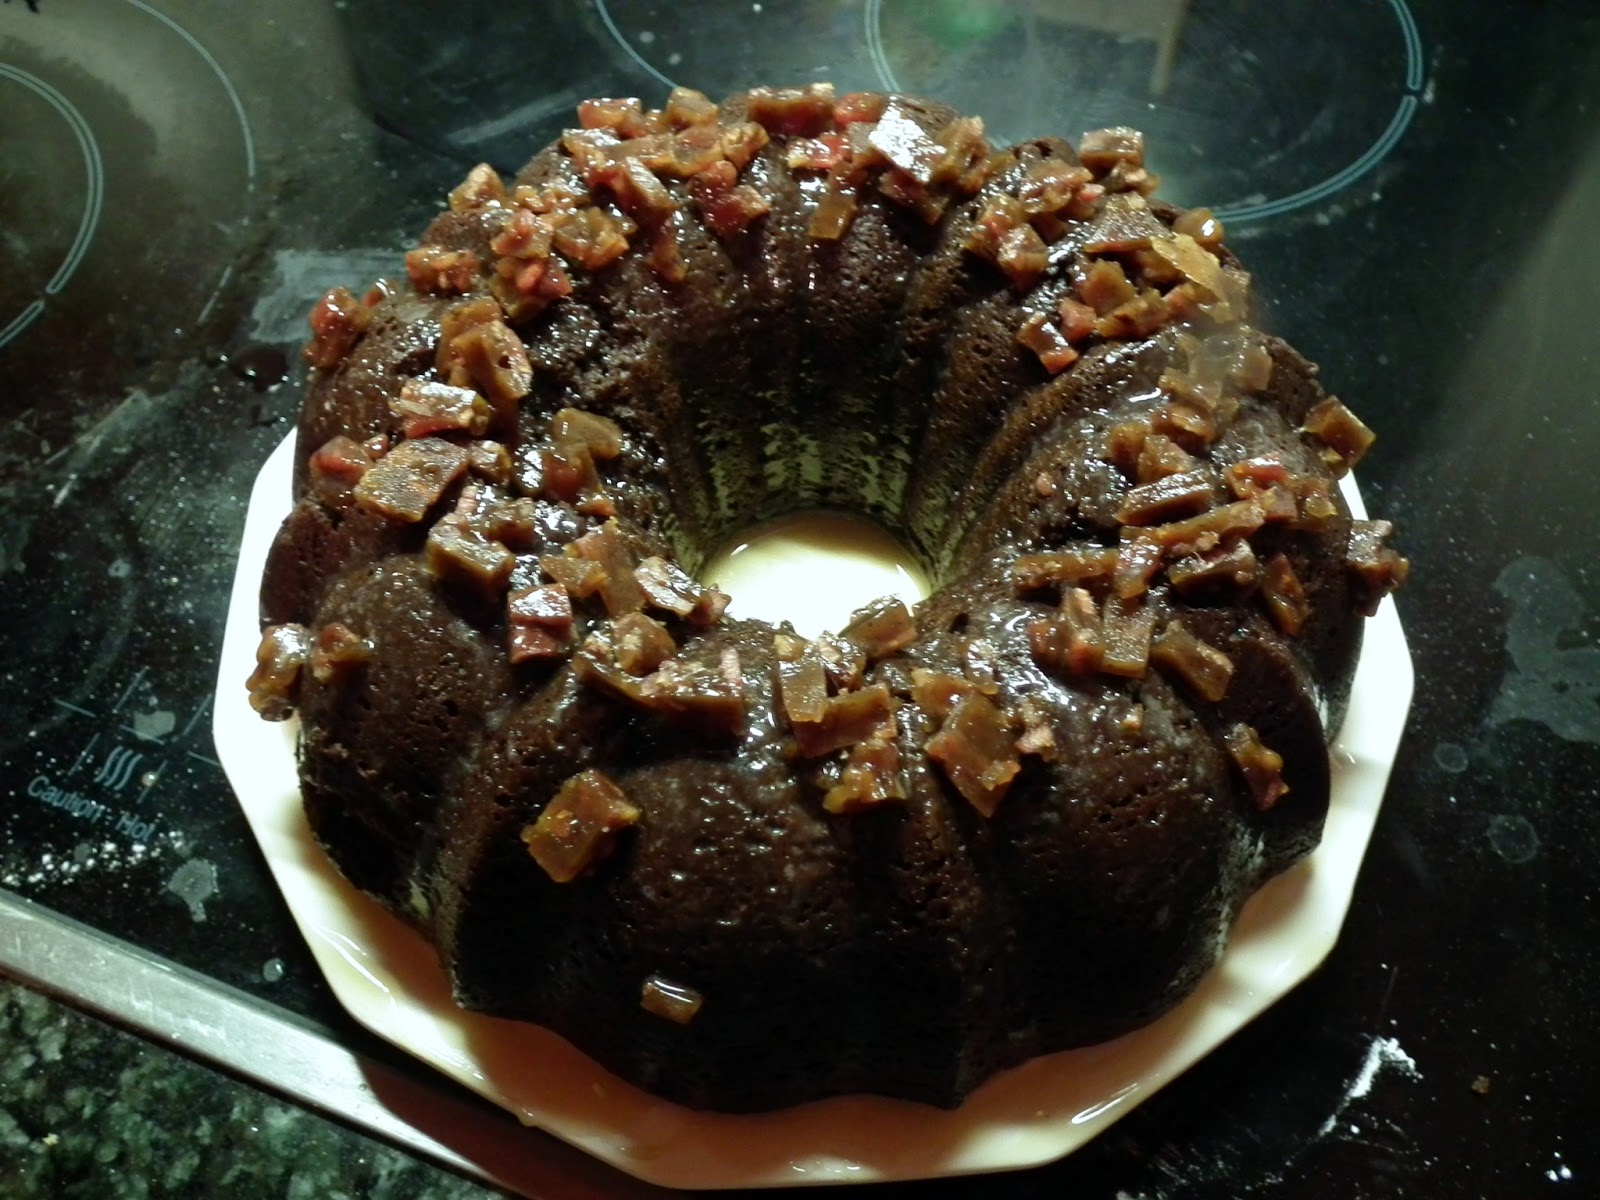
No St. Patrick's Day can go by without having corned beef and cabbage.  But like we do with most recipes, we put our own twist on the classic meal.  With Justin's roots in Pittsburgh, and my brief year there, we both love Primanti Bros.'s sandwiches, so we used that to put our own spin on a NY Deli classic.  And to round out the meal, we did some baking; but not just any baking--we used some Paddy approved ingredients such as stout and bacon and made a chocolate bacon beer cake.

So let's start with the sandwich.  There wasn't much to it tonight.  We picked up a nice, crusty white loaf of rustic Italian bread, and cut some thick slices to toast up, and slathered on some whole grain mustard.  We warmed up some thickly sliced corned beef from the deli, and some leftover slices of mortadella.  Instead of the traditional coleslaw, we used our homemade sauerkraut for the cabbage component.  And for the potato component, we made some homemade fries, tossed in some rendered bacon fat.  Pile everything on the bread...meat, 'kraut, fries...smash!
It rivaled the real thing!

Now for the cake.  I'm usually not much of a baker, but since it involved bacon and beer, I figured I'd give it a shot.  We started by rendering down the bacon.  Once it was crispy, we poured off most of the fat, and then added in some Jameson, Boatswain chocolate stout (only $1.99 from Trader Joe's!), some maple syrup, and a bit of brown sugar to deglaze the pan and candy the bacon.  Once the liquid cooked down and resembled caramel, we poured it onto a silicone mat to cool.
Without cleaning the pan, we melted the butter and added a cup of the stout to start on our cake batter.  Once the butter was melted, we whisked in the cocoa powder.  In a separate bowl we beat together the sour cream and eggs, and then added those to the chocolate stout mixture.
Then we slowly mixed in the dry ingredients until everything was completely mixed together.  We poured half of the batter into a greased bundt pan, and then added in some of the candied bacon.
The rest of the batter was poured into the pan.  Before throwing it in the oven, I gave the pan a couple quick twists to make sure the batter was distributed evenly.  It went into the oven for about 45 minutes.
Once we turned the cake out onto a cooling rack, we let it cool while we made the maple glaze.  One of my Chirstmas presents that I forgot to mention here, was a subscription to Saveur, and the first issue I received was all about donuts, including about a dozen different glazes, including a maple glaze.  As always, we added our own twist though.

So into a pot went some heavy cream, powdered sugar, maple syrup and a dash of salt.  That was the original recipe.  But it wouldn't be St. Patrick's Day without some Bailey's Irish Cream.  So we put a bit of that into the glaze.  And since we used all of the chocolate stout for the cake, we added in a dash of Mothership Connection, a beer by Chocolate City Beer, here in DC.  It's a tasty Weizenbock that added a fruity sweetness to the glaze.

Once the cake cooled, we drizzled the glaze over the top, and added the rest of the candied bacon.
How good does that look?  The cake was light and fluffy, and tasted like a brownie, while the bacon added a little saltiness and cut the sweetness from the glaze.  We definitely took advantage of it being our cheat day, and hopefully Justin's housemates will eat the rest of the cake so we don't have to.  With corned beef, potatoes, and lots of beer it was a meal that could drive the snakes from Ireland, and drive some hungry people to the table!

March 11, 2013

Homemade Kimchi

You've heard us talk about our homemade kimchi a few times (here and here), and we're finally spilling the beans on how we made it.

We used this recipe, given to us by my cousin, that came from The Lucky Peach.

We just had a head of regular green cabbage on hand, rather than the suggested napa cabbage, but from our previous experience, the green cabbage worked just as well.  Start by chopping your cabbage into big hunks.  You'll season liberally with salt and sugar, and let it sit in the fridge overnight.


Next, you'll want to whip up the seasonings.  In a food processor, puree the garlic, ginger, soy sauce, Korean chili flake, fish sauce, and brine shrimp.
Once that's formed a nice paste/sauce, dump it over your cabbage, carrots and green onion.  We also added some daikon to the mix.  Here's where you'll want to get in there with your hands to make sure the spice mixture gets into all the nooks and crannies of the cabbage.
Once everything is good and mixed, you'll want to stuff everything into a clean glass jar that can be sealed air tight.  We used the jars we picked up from Ikea, that we've also used for our sauerkraut.  Stuff as much of the cabbage as you can into the jar.  If you don't have a jar, you can also use a plastic container with a lid.  In our first attempt at making kimchi, we went this route, and it came out great!  The key is to make sure that the cabbage is packed in as tightly as possible, and no air can get in.
Then you just place it in the fridge and let it ferment.  After a week or so, it'll be ready to go!

March 4, 2013

CSA Recap

It's that time again...time for our bi-weekly recap of how we used our CSA goods.  As a refresher, here's what we picked up
And here's how we used our goods:
Tomorrow's share is looking to be a good one, so stay tuned to see what we bag!

March 3, 2013

This is How We Roll

If you are one of our loyal readers you are probably aware that Justin and I are not huge fans of cabbage.  Despite us both having connections to Pittsburgh, our familiarity with polish food was pretty limited to a restaurant in Santa Monica.

But the last remaining item from our share was the head of cabbage.  And since we still have some homemade sauerkraut and kimchi in the fridge, we decided to actually use the cabbage as the star in our show for dinner tonight.  We scoured the internet for recipes, and stumbled across this guy for stuffed cabbage rolls.

You'll want to start off by coring your cabbage, and then placing it into a pot of boiling water to cook the leaves.  As they start to pull away from the head, carefully remove them, keeping the leaves whole.  Any smaller leaves that you can't pull off whole, can be placed into the bottom of your baking dish.
At the same time, saute the onions and celery in a pan with some butter.  We chose to include the celery leaves for some additional celery flavor since they looked so good.  Once they've cooked down, and are soft, place them in a bowl to cool.  We were growing hungry, and impatient, so we stuck ours in the fridge for a few minutes.
Once the celery/onion mixture has cooled, add an egg, the pork and beef..  You really just want to make sure that the onions and celery aren't piping hot.  Otherwise you'll get scrambled eggs and it will start to cook your meat.  The recipe just calls for seasoning of salt and pepper, but we put our own spin on things and also added some paprika, roasted garlic salt in place of plain Kosher, and some red pepper flake.  Toss that around so everything is good and mixed.

Then you start stuffin'!  Spoon some of the meat mixture into each cabbage leaf.  The size of the leaves will determine how much meat you can stuff it with.  Then you just roll it up like a burrito, so all sides are tucked under.  Place the rolls, seam side down, into your baking dish.  If you need to create a second layer of rolls, that's fine.


Every 30 minutes, you'll want to baste your rolls with the juices that have leached out.  At this time, if the rolls on the 2nd layer are a little charred, you can swap places with rolls that are on the bottom.


When your rolls are just about done baking, you can start on the sauce.  The grocery store didn't have any good looking cremini mushrooms, so we went with some portabellas.  Start by chopping them into smaller pieces, and cooking them down in some butter.  After a few minutes, add the garlic.  Once the garlic has turned a golden brown, add your beef stock, cooking sherry (since the wine was at my place), and the juices that have leached out from the cabbage rolls.  For seasoning, we added some fennel seed, thyme, roasted garlic salt and pepper.
As the sauce came together, we added a little cornstarch to thicken it up.  Once your sauce tastes good, and is the right viscosity, you're ready to serve!

These things are delicious! Even if you aren't big fan of cabbage give them a try.  They are relatively healthy to boot and there is just enough butter and pork to make them yummy!

February 19, 2013

CSA Day!

Hooray for CSA day!  Today's share is a little smaller than what we've been getting, but we have plenty of leftovers from our Chinese feast yesterday to help fill in some of the gaps.

So here's what we picked up...
The infamous cabbage is back!  I'm not sure what we'll do with it quite yet, but hopefully we can come with something other than sauerkraut or kimchi.  The oysters came pre-shucked, so my paring knife will be spared any further damage.  To Justin's credit, he did replace my paring knife with a much higher quality one :)

We'll be turning to our trusty cookbooks, the interwebs, and our own creative minds to come up with delicious uses for all these tasty ingredients.  Stay tuned!

January 8, 2013

Going Stir Fry Crazy!

Its Tuesday...Tuesday...gotta get down on Tuesday...

Ok, I guess it doesn't quite have the same ring to it as Friday, but it brings the same excitement since we finally had a CSA share to pick up.  It feels like an eternity since our last share, and we were both chompin' at the bit to see what we'd get today.  So ...without further ado...
Wouldn't it be our luck that we got ANOTHER cabbage!  We're really excited about our meat share...the bison NY strip steak and the pork sausages.  For the sausages we had a choice between ham with cider, or pork butt and pork bellies.  It was an obvious choice here.  I'm pretty excited about the purple carrots and the kholrabi as well.  I don't think I've eaten kholrabi, so it will be fun experimenting with it.

And since its been a while since we've whipped something up in the kitchen, we're bringing you tonight's meal...free of charge!

We thought ahead for once and defrosted some chicken overnight, knowing we'd need a protein to go with whatever veggies we picked up tonight.  To keep things simple, and since I scored a new wok for Christmas, we settled on a Thai peanut stir-fry.

So here's what we started wth...the purple carrots, broccoli, a sweet potato, spinach and some dill from the share.  The green onions and mushrooms were leftover from the weekend and needed to be used.  So  got to peeling and chopping the sweet potato and the purple carrots.

Look how pretty these carrots are!
While I finished chopping everything, Justin was busy cutting the chicken breasts into chunks.  Then he lightly coated them in some seasoned flour.  We used coconut oil to cook everything, so that went into the wok with a few cloves of minced garlic.  Once that was nice and aromatic, we threw in the carrots and sweet potatoes, since those would take the longest to cook, along with the chicken.

Once the chicken browned a bit, we threw in the broccoli.  As the chicken continued to cook, we threw in the mushrooms, spinach, and green onions.  We also threw in a bit of sesame oil for an added layer of flavor

Once the spinach wilted, it was time to make the sauce.  We started by adding the coconut milk.  Then came the peanut butter.  
We just kept mixing and stirring until the peanut butter had melted down and everything was coated in sauce.  To top off the dish, we toasted up some sesame seeds, drizzled on some sriracha, and sprinkled on some chopped dill.
It was a great way to kick off this week's share!